In this article, we are going to explore how to easily add Algolia search to a Windows Phone 8.1 application with an ASP.NET MVC backend. To do this, we will take advantage of Algolia’s C# client to add indexing capabilities to the ASP.NET MVC application and search capabilities to the Windows Phone application.
The application we will be building is called PackageTrack. It is a simple web application where a user can create, read, update, and delete packages they like and use. The web application will be capable of managing the package information, indexing that data with Algolia, and providing a simple REST API for the data. We will also create a Windows Phone application with an auto suggest search box hooked into the Algolia search service to provide search results. Users will then be able to select one of the search results and have that information shown by requesting the data from the web application API.
Prerequisites
In order to follow along well, it will be helpful to share versions of tooling, operating system, and technology used for the tutorial. You will need to use (at the very least) Visual Studio 2013 with update 4. Also, in order to develop Windows Phone 8.1 applications, you will need to be developing on Windows 8 or greater. Finally, the application is being built using .NET framework 4.5.
Create a new ASP.NET Web Application
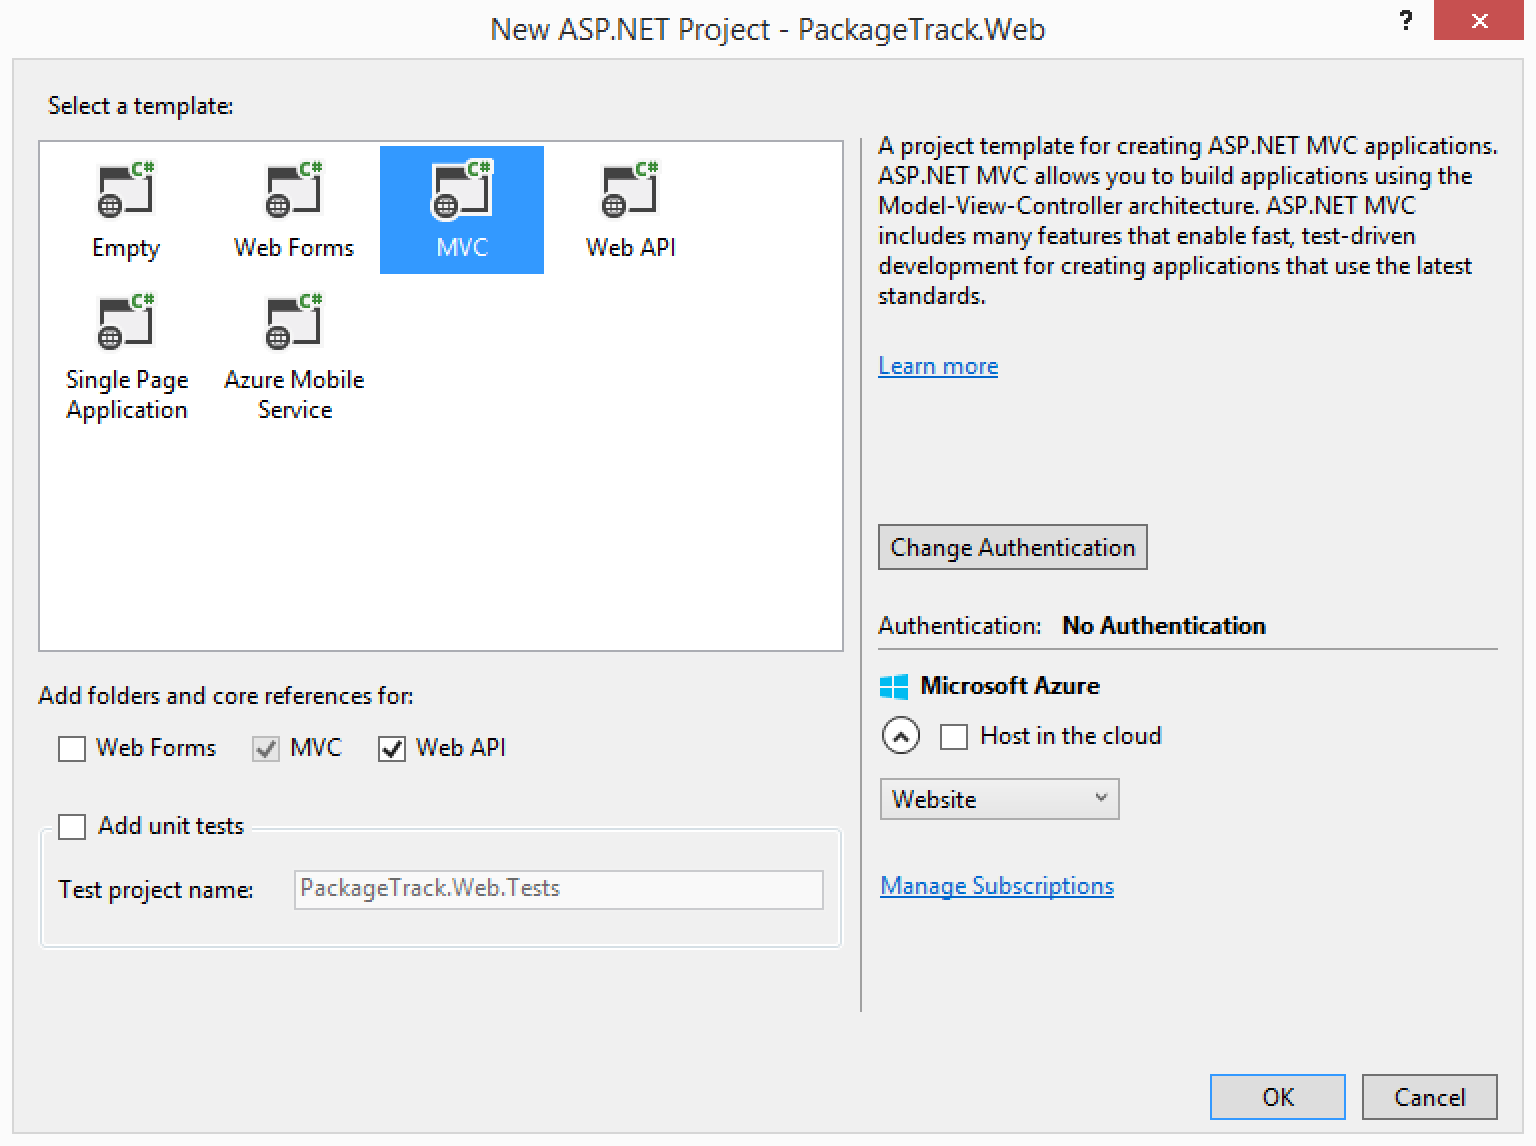
With Visual Studio running, create a new solution and choose an ASP.NET Web Application for your initial project. If you want to follow along exactly, name your solution PackageTrack and your project PackageTrack.Web.

To keep this tutorial simple, change the authentication to No Authentication.
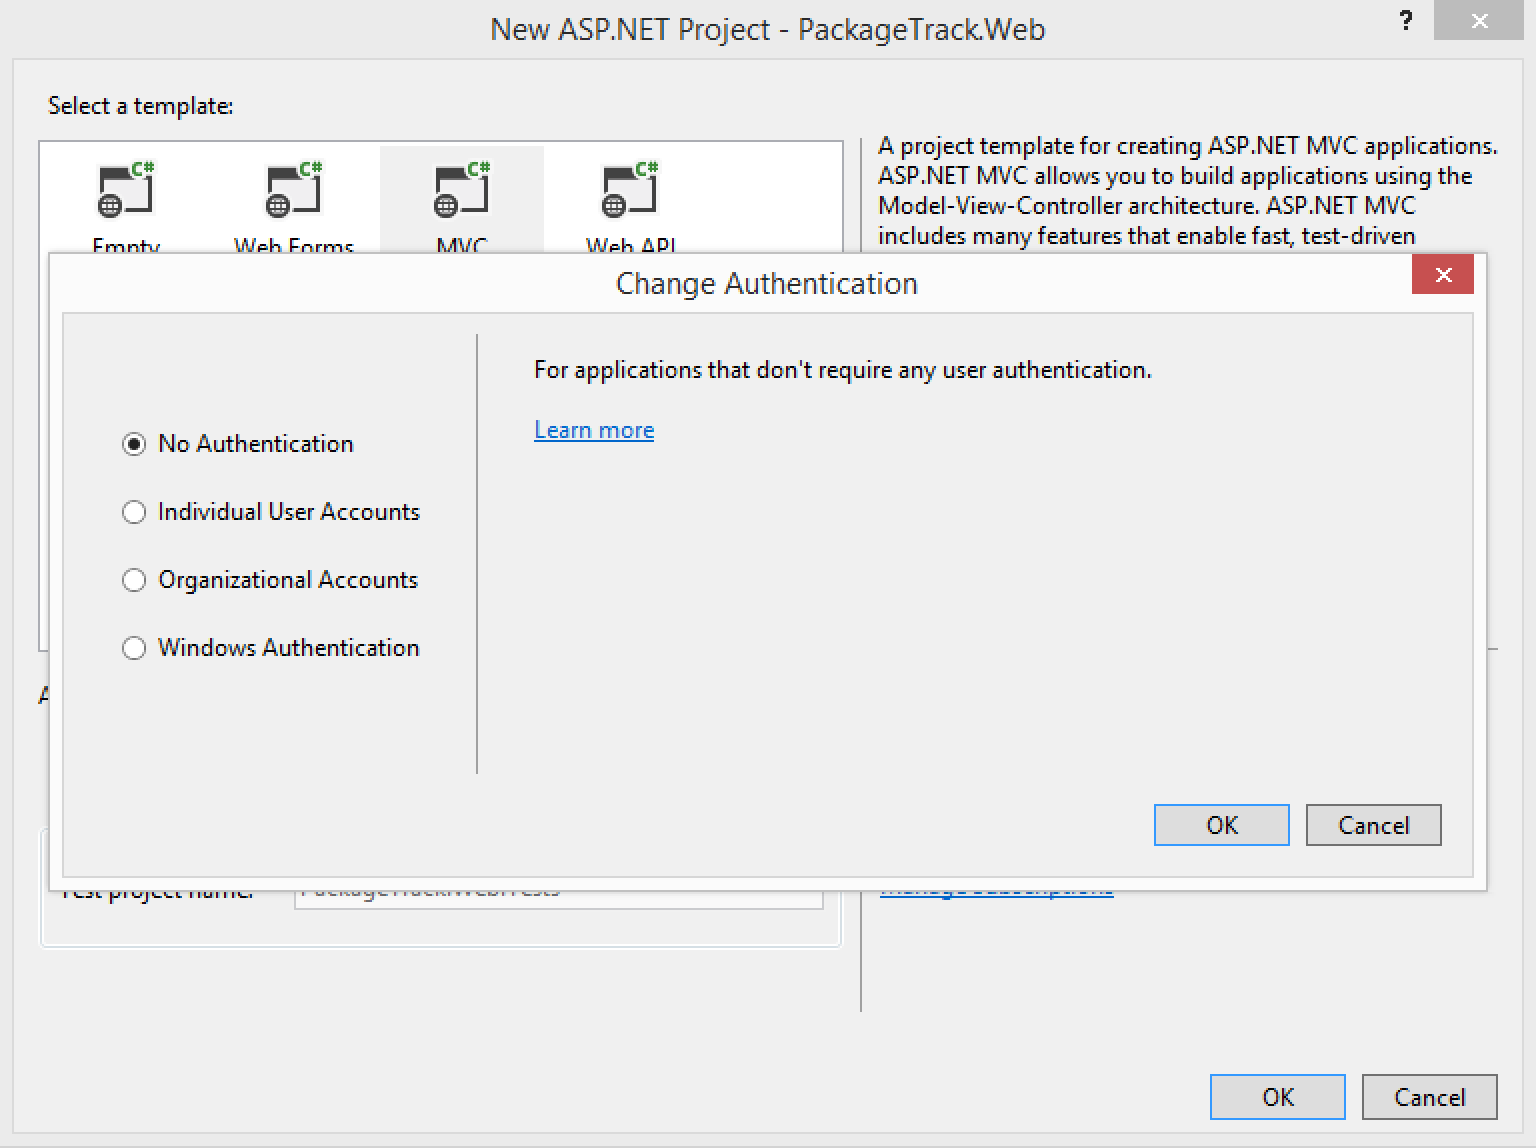
You will also want to make sure MVC and Web API are selected.
Install necessary NuGet packages
This application requires two new packages in order to work.
Entity Framework
Install the Entity Framework package. The version used in this tutorial is 6.1.3.
1
| |
Algolia Search
Install the Algolia Search package. The version used in this tutorial is 3.0.5.
1
| |
Finally, we need to update all installed packages to make sure we are using the latest libraries and scripts. You can do this by right clicking the web project in Solution Explore and choosing Manage NuGet Packages....
Cleanup
Now that we have our packages installed and updated, we need to perform a little cleanup in our project.
First, let’s delete the Home Controller, HomeController.cs, and the Home directory within Views. We are removing the controller and its views because we will be creating our own later.
Update our layout
Our layout needs a little updating to improve the look and feel a bit. Update \Vieews\Shared\_Layout.cshtml with the following.
1 2 3 4 5 6 7 8 9 10 11 12 13 14 15 16 17 18 19 20 21 22 23 24 25 26 27 28 29 30 | |
Entity Framework and Database
We are now ready to create our model and DbContext in order to take advantage of Entity Framework. What we will do is a create a simple model to represent our package that we want to store in the database. After that, we will create our DbContext which will allow us to easily add, remove, update, and more on our packages stored in the database.
By default, the project is setup to use a local MDF database. You are welcome to change it but for simplicity this tutorial will not.
To create our package model, create a new file named Package.cs inside the Models directory. Update the created class to look like the following.
1 2 3 4 5 6 7 | |
Next, we need to create our DbContext. To do this, create a new directory called Data at the root of the project. Then create a new file named PackageTrackContext.cs inside this new directory. Update the code to the following.
1 2 3 4 5 6 7 8 9 10 11 12 13 14 | |
Before moving on, be sure to build your solution. This will be necessary for the next steps where we use Visual Studio tooling to scaffold our CRUD controller and views for us.
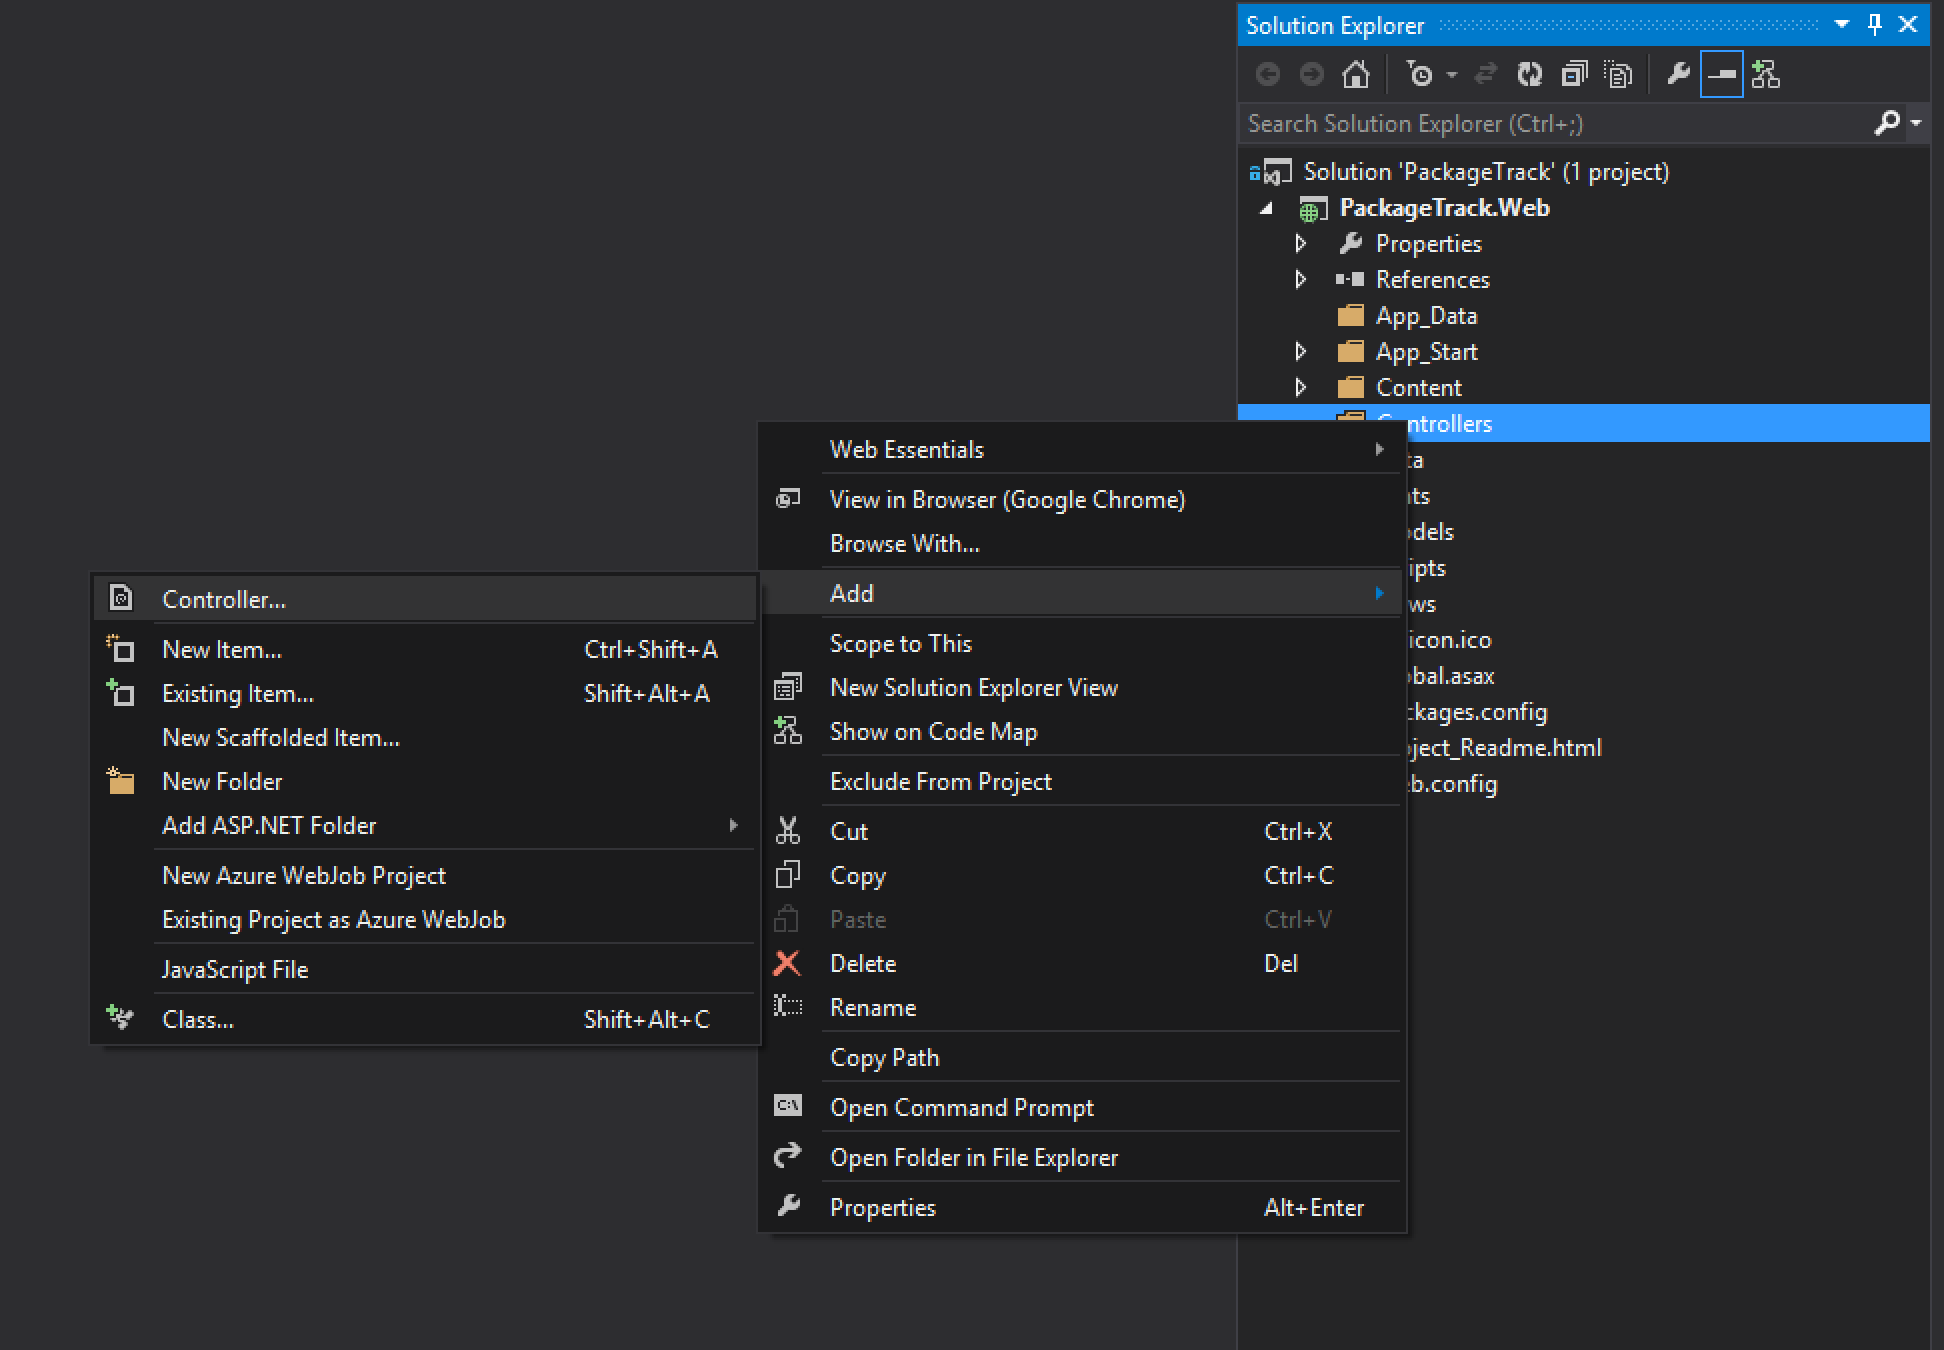
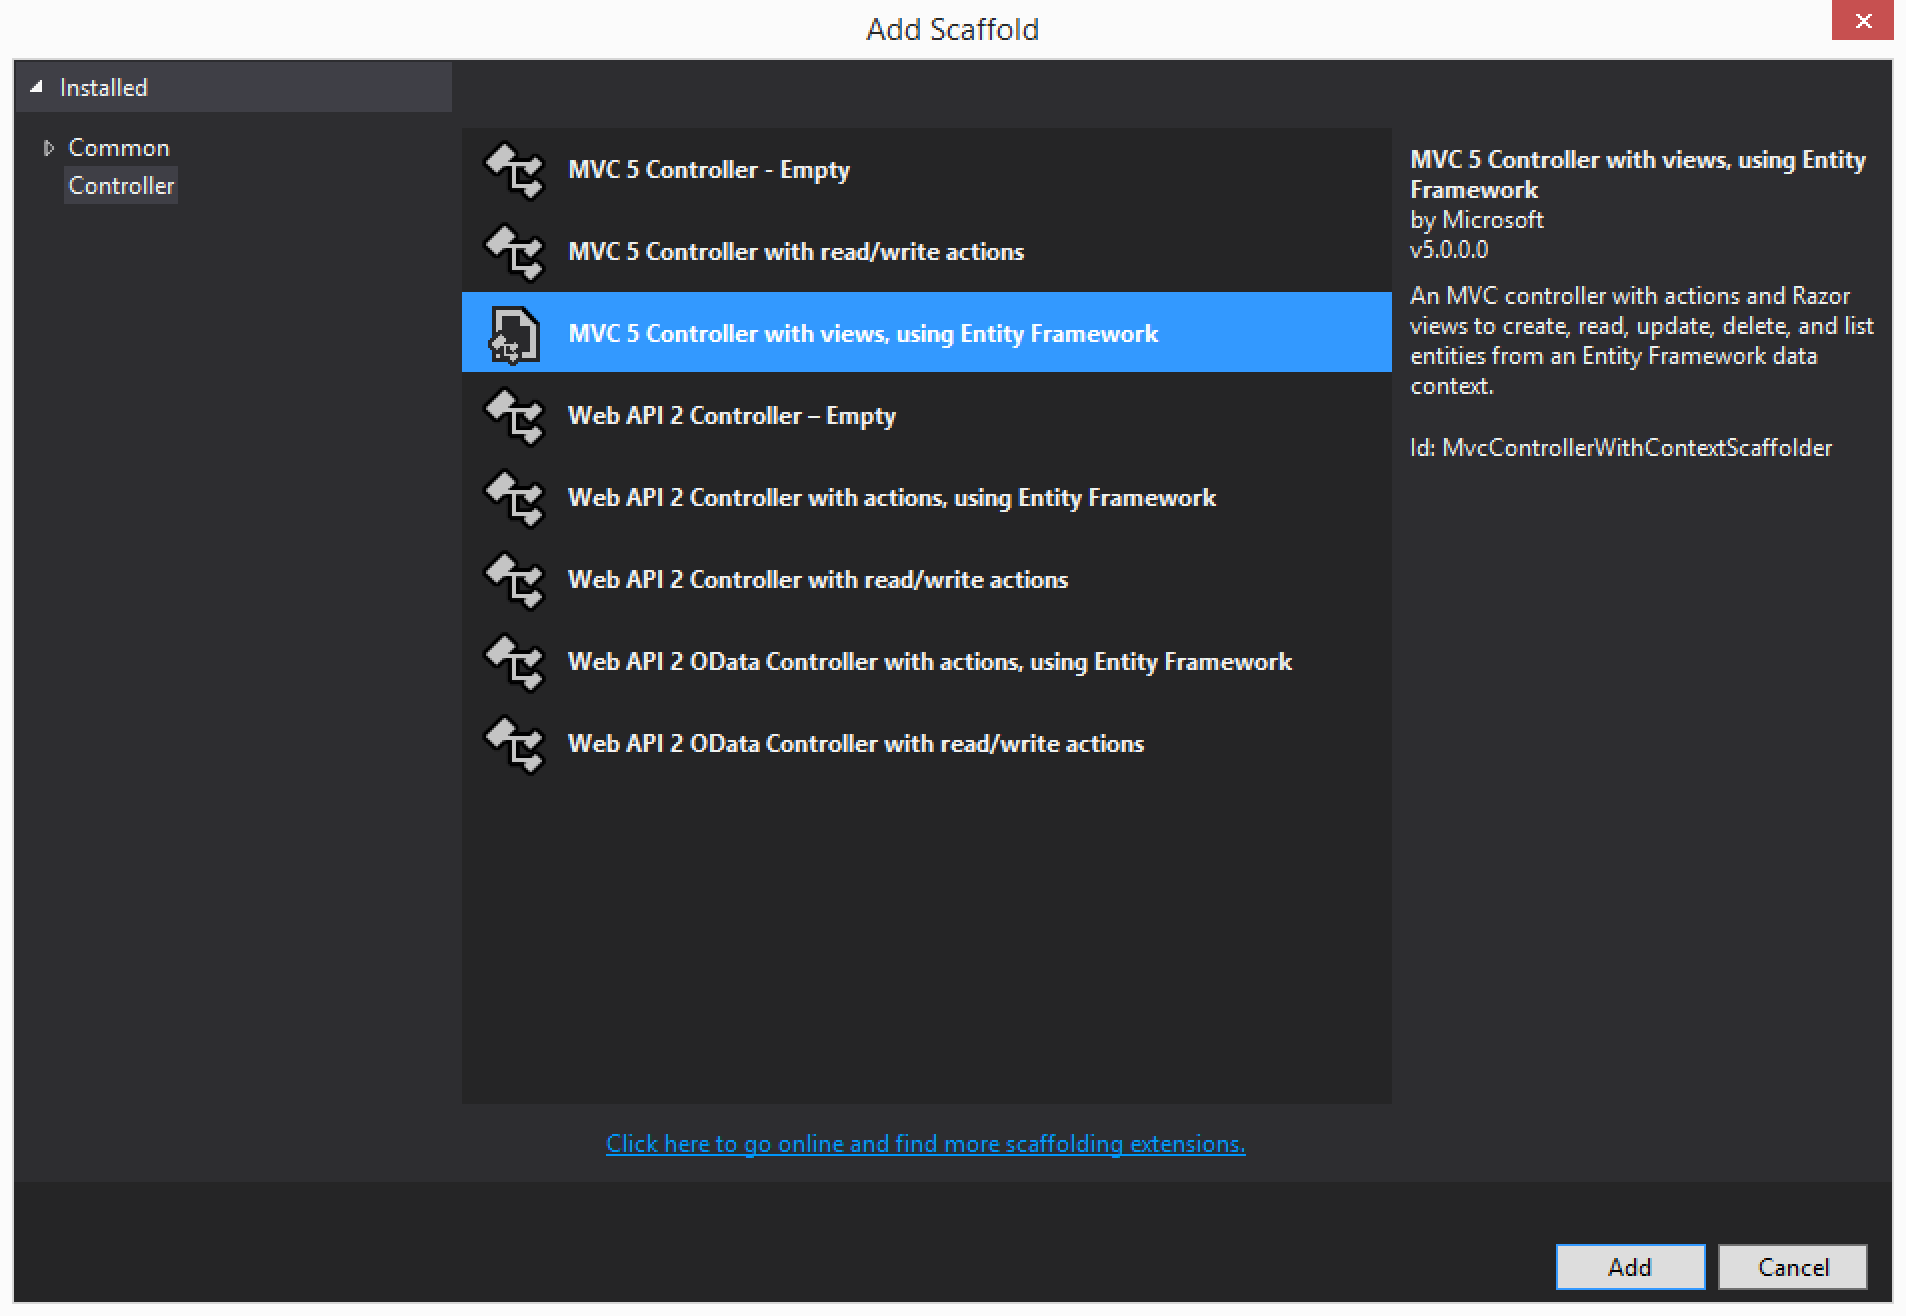
Package CRUD
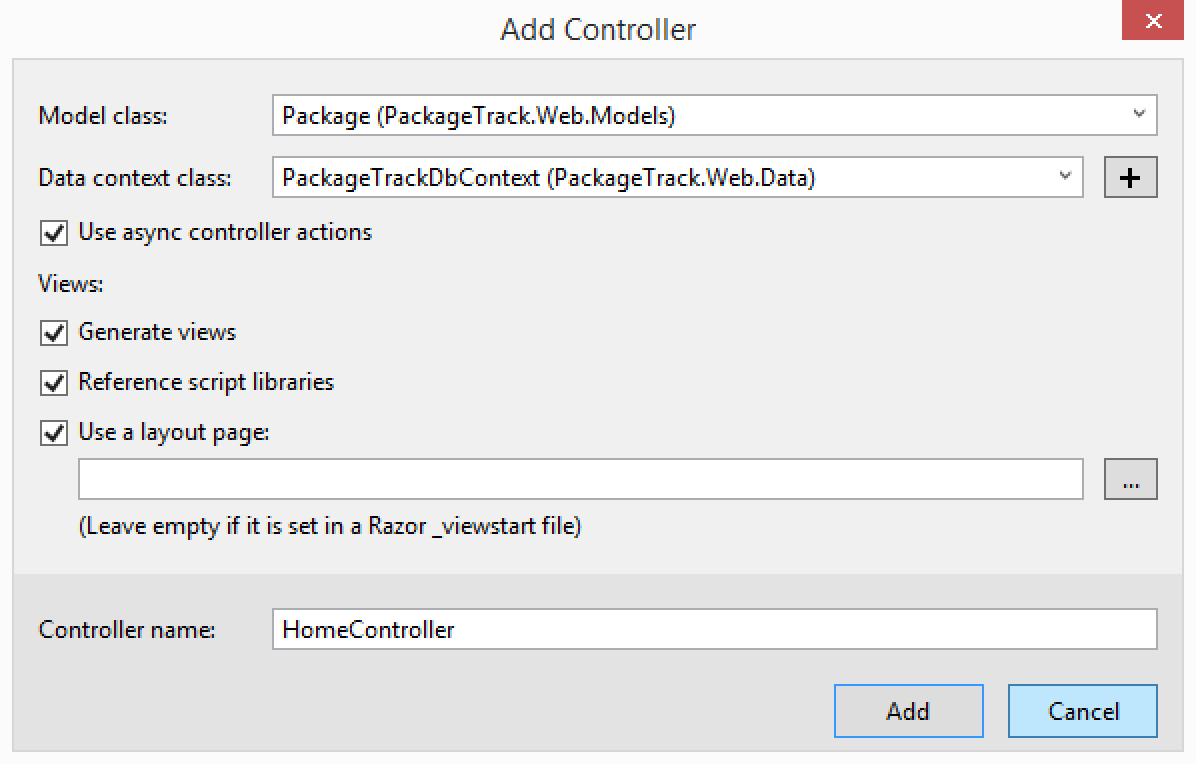
We now need to create the controller, actions, and views in order to create, read, update, and delete packages. To do this we will use Visual Studio tooling. This will make it super simple. The following 3 screenshots show what to do.
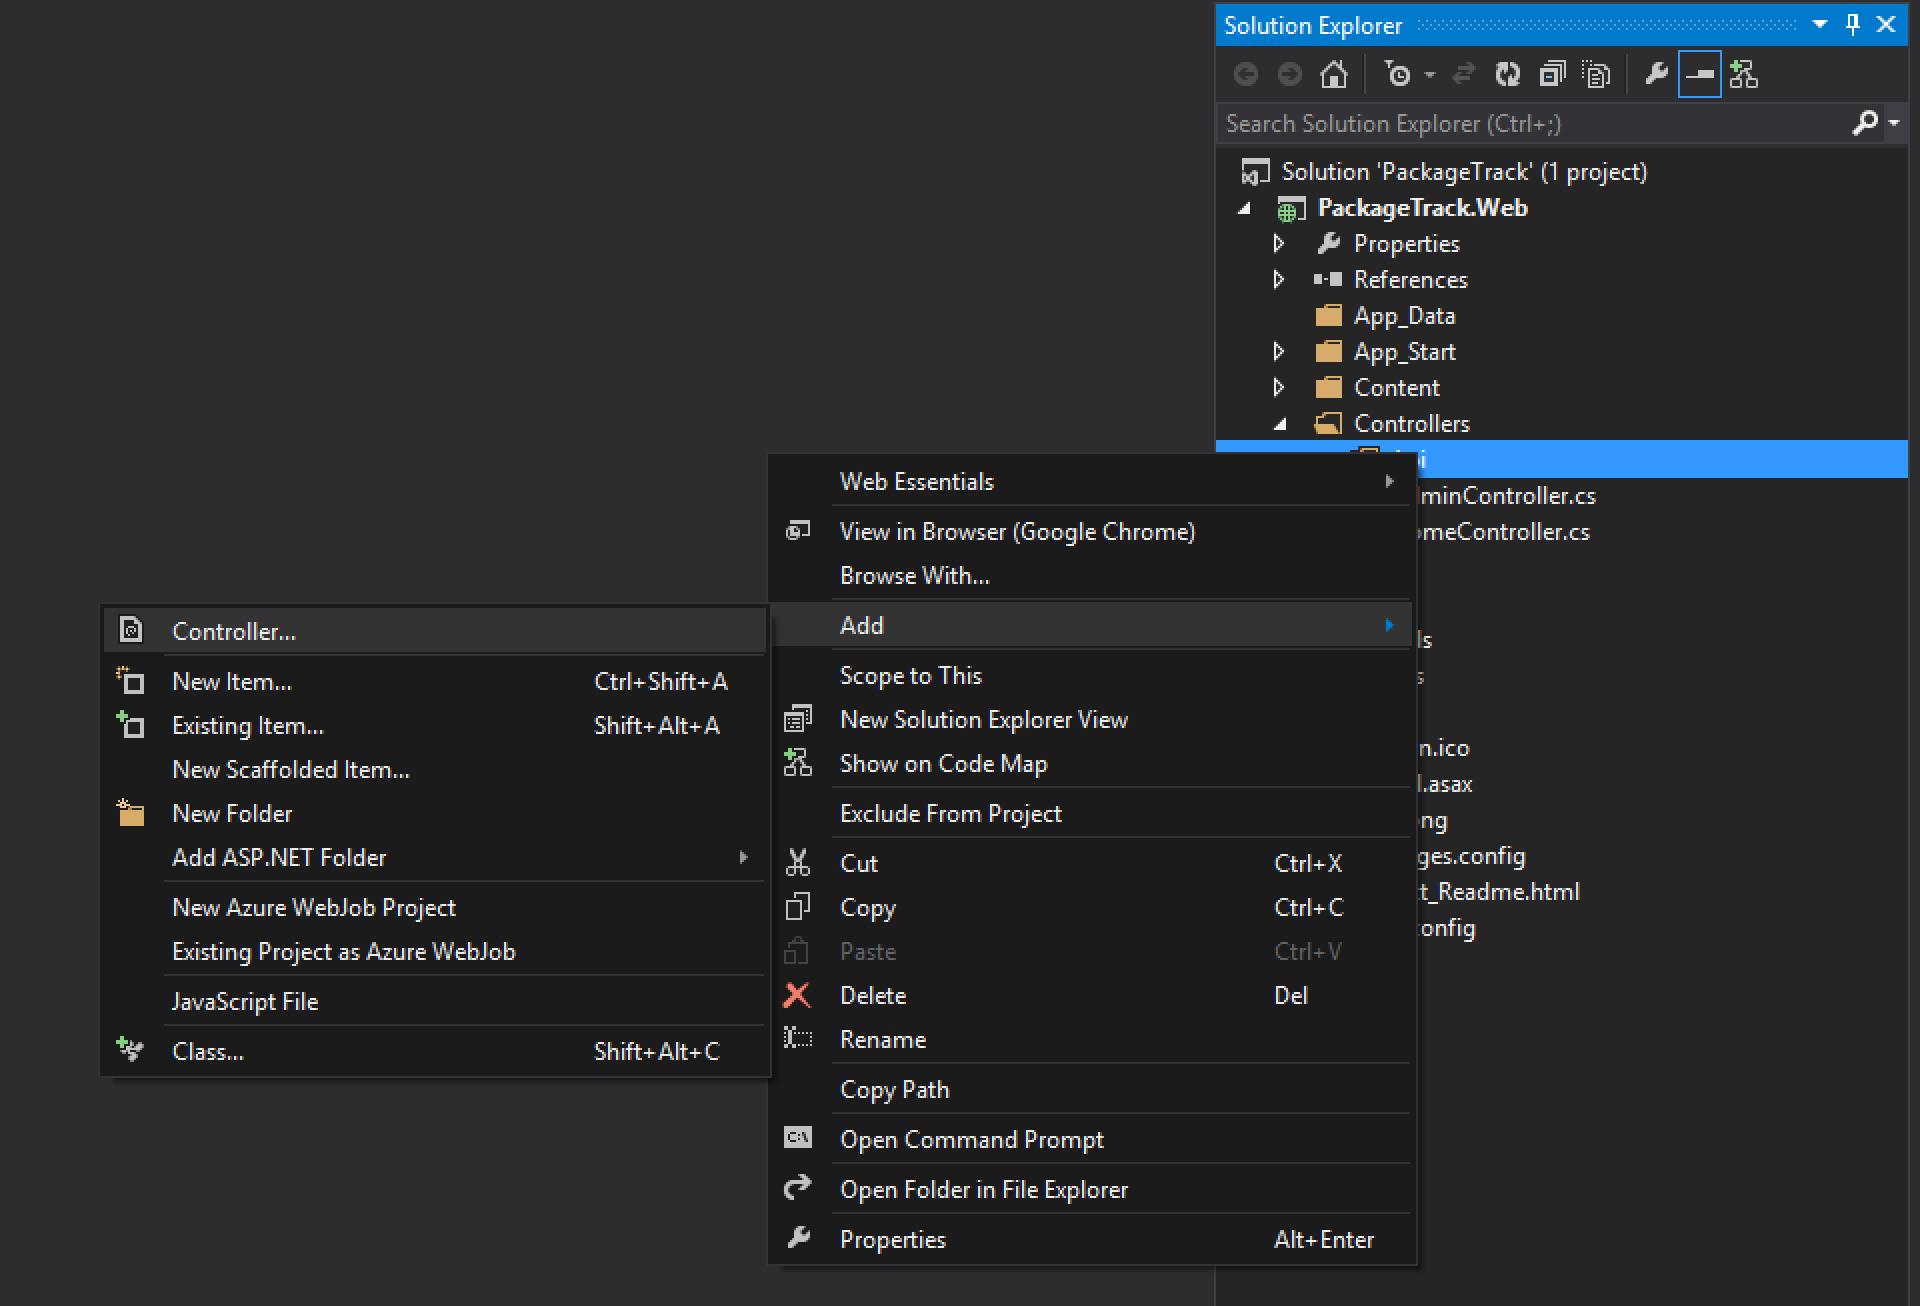
First, right click the Controller directory and choose Add followed by Controller.
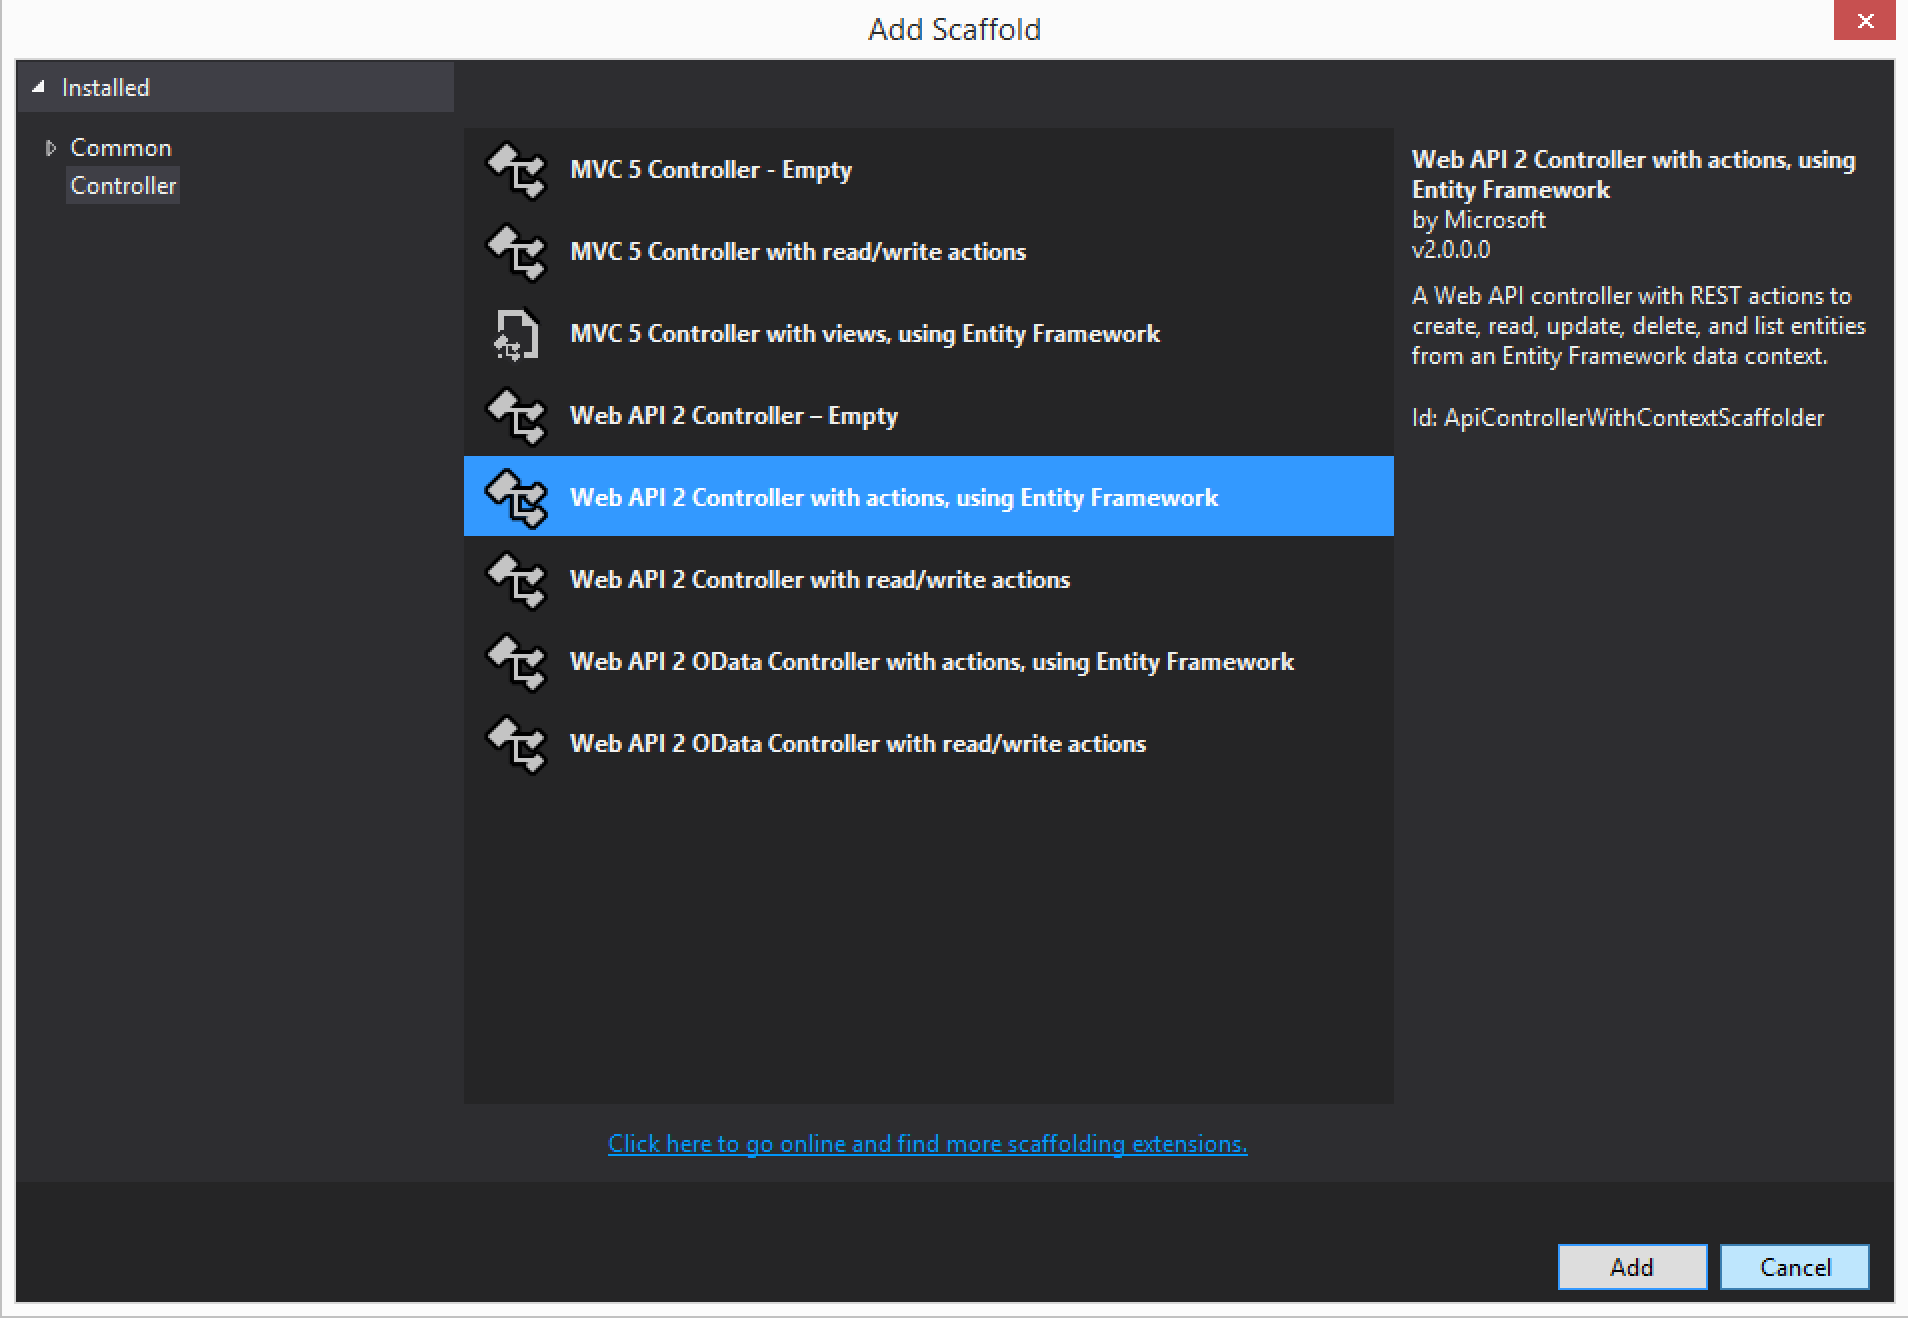
Next, choose MVC 5 Controller with views, using Entity Framework.
Finally, be sure to choose the Package model we created for the Model class, the PackageTrackDbContext we created for the Data context class, check Use async controller actions, and set the Controller name to HomeController.
Visual Studio should create a new HomeController along with a set of views. You can now build and run your project. You should be able to create, read, update, and delete packages. Go head and do this now and create a few packages. We will need them later.
Build an Admin controller
We now need to create an Admin controller that will provide us the ability to issue index, re-index, and delete commands to our Algolia index.
Inside the Controllers directory, create a file named AdminController.cs. Update it to contain the following code.
1 2 3 4 5 6 7 8 9 10 11 12 13 14 15 16 17 18 19 20 21 22 23 24 25 26 27 28 29 30 31 32 33 34 35 36 37 38 39 40 41 42 43 44 45 46 47 48 49 50 51 52 | |
Inside the Views directory, create a new directory named Admin. Now that we have a new place for our admin views, create a new view there named Index.cshml. This is where we will setup our ability to issue index commands. Update the view with the following code.
1 2 3 4 5 6 7 8 9 10 11 12 13 14 15 16 17 18 19 20 21 22 23 24 25 | |
Now we need to create 3 views that can be used to show when our index commands have completed. Create the following views with their markup inside the Views\Admin directory.
ReIndexData.cshtml
1
| |
IndexData.cshtml
1
| |
DeleteData.cshtml
1
| |
Algolia time
Up to this point, we have been doing standard .NET development and nothing with Algolia (except adding the NuGet package). We are now ready to start.
Since our web application allows our users to create, update, and delete packages, we need to be able to do the same things to our Algolia index. On top of that, there are cases where we need to perform an index on all of our data, do a full re-index where data is removed and then added, and also remove all data from our index. We do all this from our web application rather than the Windows Phone application because it is much more secure to have our server talking to Algolia rather than each client. We don’t want our credentials that allow changing index data to fall into a user’s hand.
Create reusable Algolia client
The AlgoliaClient allows our application to easily interact with our Algolia index. In order to keep performance optimal, we don’t want to create an instance of this client each time we need it. To address this, we will create one AlgoliaClient and store it in an Application Variable.
Let’s go ahead and do this now.
Open up your Global.asax.cs file and update it as follows.
1 2 3 4 5 6 7 8 9 10 11 12 13 14 15 16 17 18 19 20 21 22 23 24 25 26 27 28 29 30 31 32 33 34 35 36 37 | |
What we are doing here is first creating an AlgoliaClient using our application id and key. You will need to update these two values using your own credentials. You can either use the Admin key already created for you or create your own key and choose the permissions allowed.
Next, we create an IndexHelper and inject our AlgoliaClient into it along with the name of the index and the value of our Package model identifier that should be mapped to the Algolia index object Id. The reason we want to specify the identifier in our model is because the IndexHelper will automatically build and map our model to the Algolia index object.
Finally, we add our IndexHlper to the application variable so we can use it elsewhere in our application.
One thing to note is the index we are using in Algolia is called packages. You can either create it ahead of time or it will be automatically created when you issue index commands.
Update our Admin controller to work with Algolia
Now that we have an Algolia IndexHelper to use, we need to update our Admin controller to talk to Algolia when someone issues an indexing command.
Update each of the 3 following actions inside AdminController.cs. Make sure and add a using statement for Algolia.Search.
1 2 3 4 5 6 7 8 9 10 11 12 13 14 15 16 17 18 19 20 21 22 23 24 25 26 27 28 29 30 31 32 | |
The IndexHelper is very nice. It will automatically handle the steps needed to perform indexing, re-indexing, and deleting of data. The way it works is it already knows the identifier to look for in your model so when you make an OverwriteIndex, SaveObjects, or DeleteObjects call it automatically converts your model to JSON, adds an objectId field, sets the objectId field to the identifier you told it to use, and makes the necessary calls to Algolia.
Now is a great time to test things out. You should already have packages in your database that are not in your Algolia index. Try out the different functions under the /admin path. You should see your index get populated, re-populated, and cleared out depending on which function you use.
Update our CRUD to work with Algolia
Having administrative ability to manage our index is great, but we really need to have our index kept up to date as users create, update, and delete packages from our database.
We will do this by updating the actions inside our Home controller we created earlier to support our CRUD operations on packages.
Update each of the 3 following actions inside HomeController.cs. Make sure and add a using statement for Algolia.Search.
1 2 3 4 5 6 7 8 9 10 11 12 13 14 15 16 17 18 19 20 21 22 23 24 25 26 27 28 29 30 31 32 33 34 35 36 37 38 39 40 41 42 43 44 45 46 47 48 49 50 51 | |
What we did here was whenever a package is created, updated, or deleted, we use the IndexHelper to add, update, or remove the data within our index.
Go ahead and try it out.
Implement real time search
With all of our indexing in place, we are ready to add a real time search experience to our web application.
Download JavaScript libraries
We will need some JavaScript libraries in order to create the search feature. Download each of the following and save them in the Scripts directory with the names I indicate.
typeahead.jquery.js
https://cdn.jsdelivr.net/typeahead.js/0.10.5/typeahead.jquery.min.js
hogan.common.js
https://cdn.jsdelivr.net/hogan.js/3.0.2/hogan.common.js
algoliasearch.min.js
https://cdn.jsdelivr.net/algoliasearch/3/algoliasearch.min.js
Bundle new JavaScript
With the new scripts added to our project, we need to update our bundles to include them. Open up \App_Start\BundleConfig.cs and add the following new bundle.
1 2 3 4 5 | |
Update our layout
Now we need to update our layout to include a search box and the new script bundle we created.
Open up _Layout.cshtml and modify the code as follows.
1 2 3 4 5 6 7 8 9 10 11 12 13 14 15 16 17 18 19 | |
Create JavaScript to tie UI with Algolia
The following code needs to be added to a new file named main.js within the Scripts directory. This sets us up to perform searches with our packages index on Algolia. Be sure to update the application id and key using your search only key.
1 2 3 4 5 6 7 8 9 10 11 12 13 14 15 16 17 18 19 20 21 22 23 24 25 26 27 28 29 30 31 32 33 34 35 36 37 38 39 40 41 42 43 44 45 46 | |
Style the search
Finally, we want to style our search. Add the following CSS to \Content\Site.css.
1 2 3 4 5 6 7 8 9 10 11 12 13 14 15 16 17 18 19 20 21 22 23 24 25 26 27 28 29 30 31 32 33 34 35 36 37 38 39 40 41 42 43 44 45 46 47 48 49 50 51 52 53 54 55 56 57 58 59 60 61 62 63 64 65 66 67 68 69 70 71 72 | |
If you would like to get a more in depth tutorial on the real time search piece we just added, you can read other articles I wrote here.
http://scottksmith.com/blog/2014/10/21/getting-started-with-algolia-real-time-search/
http://scottksmith.com/blog/2014/10/29/algolia-real-time-search-with-twitters-typeaheadjs/
Create REST API for packages
The last thing we need to do in our web application is to build a REST based API for our package information. This will be used by our Windows Phone application.
First, create a new directory within the Controllers directory and name it Api.
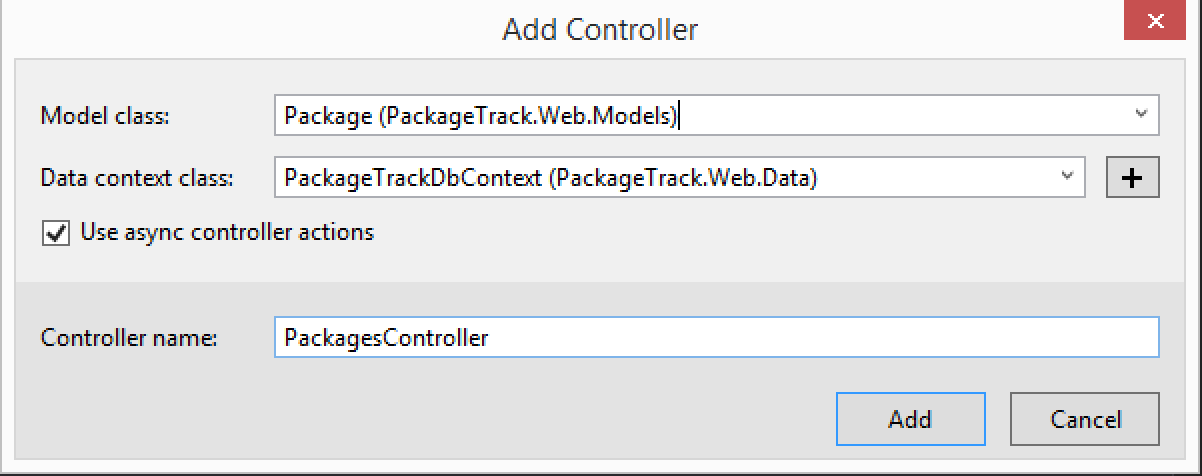
Right click on the Api folder and choose Add followed by Controller. Follow the next few screenshots to see what settings to use and values to set.
Because we want to only return JSON even when the request header is not application/json we need to update our WebApiConfig.cs file in the App_Start directory.
1 2 3 4 5 | |
We are now ready to create our Windows Phone application that will perform searches using Algolia and show data from our web application.
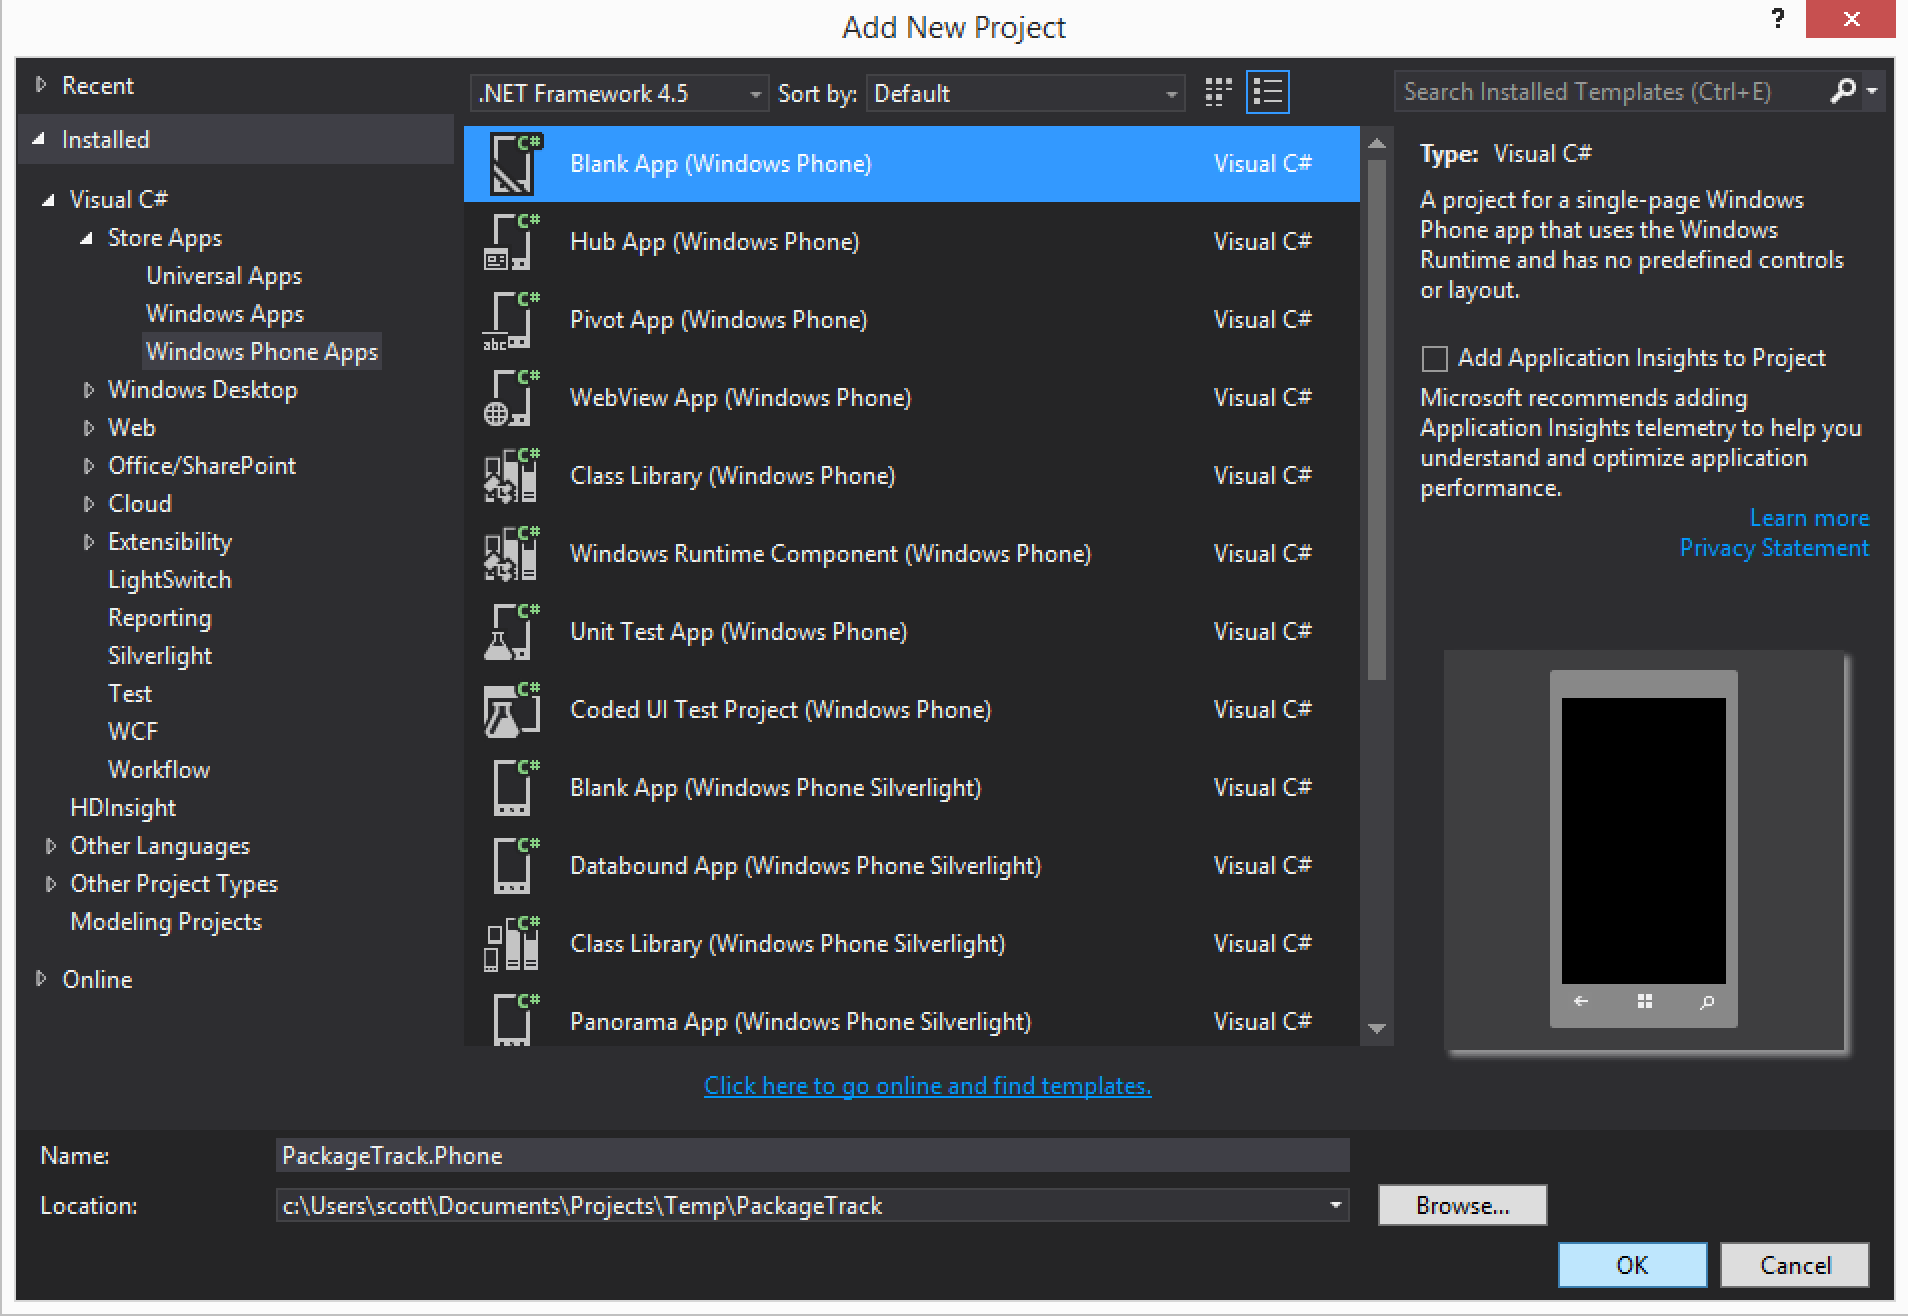
Create a new Windows Phone Application
In our current solution, create a new project and choose Blank App (Windows Phone). You can name it whatever you like, but I went with PackageTrack.Phone.
Install necessary NuGet package
This application requires one new package in order to work.
Algolia Search
Install the Algolia Search package. The version used in this tutorial is 3.0.5.
1
| |
Configure startup projects
In order for both applications to work, we need to configure our solution to start the web and phone application when we build and run. The following screenshots show how to do this.
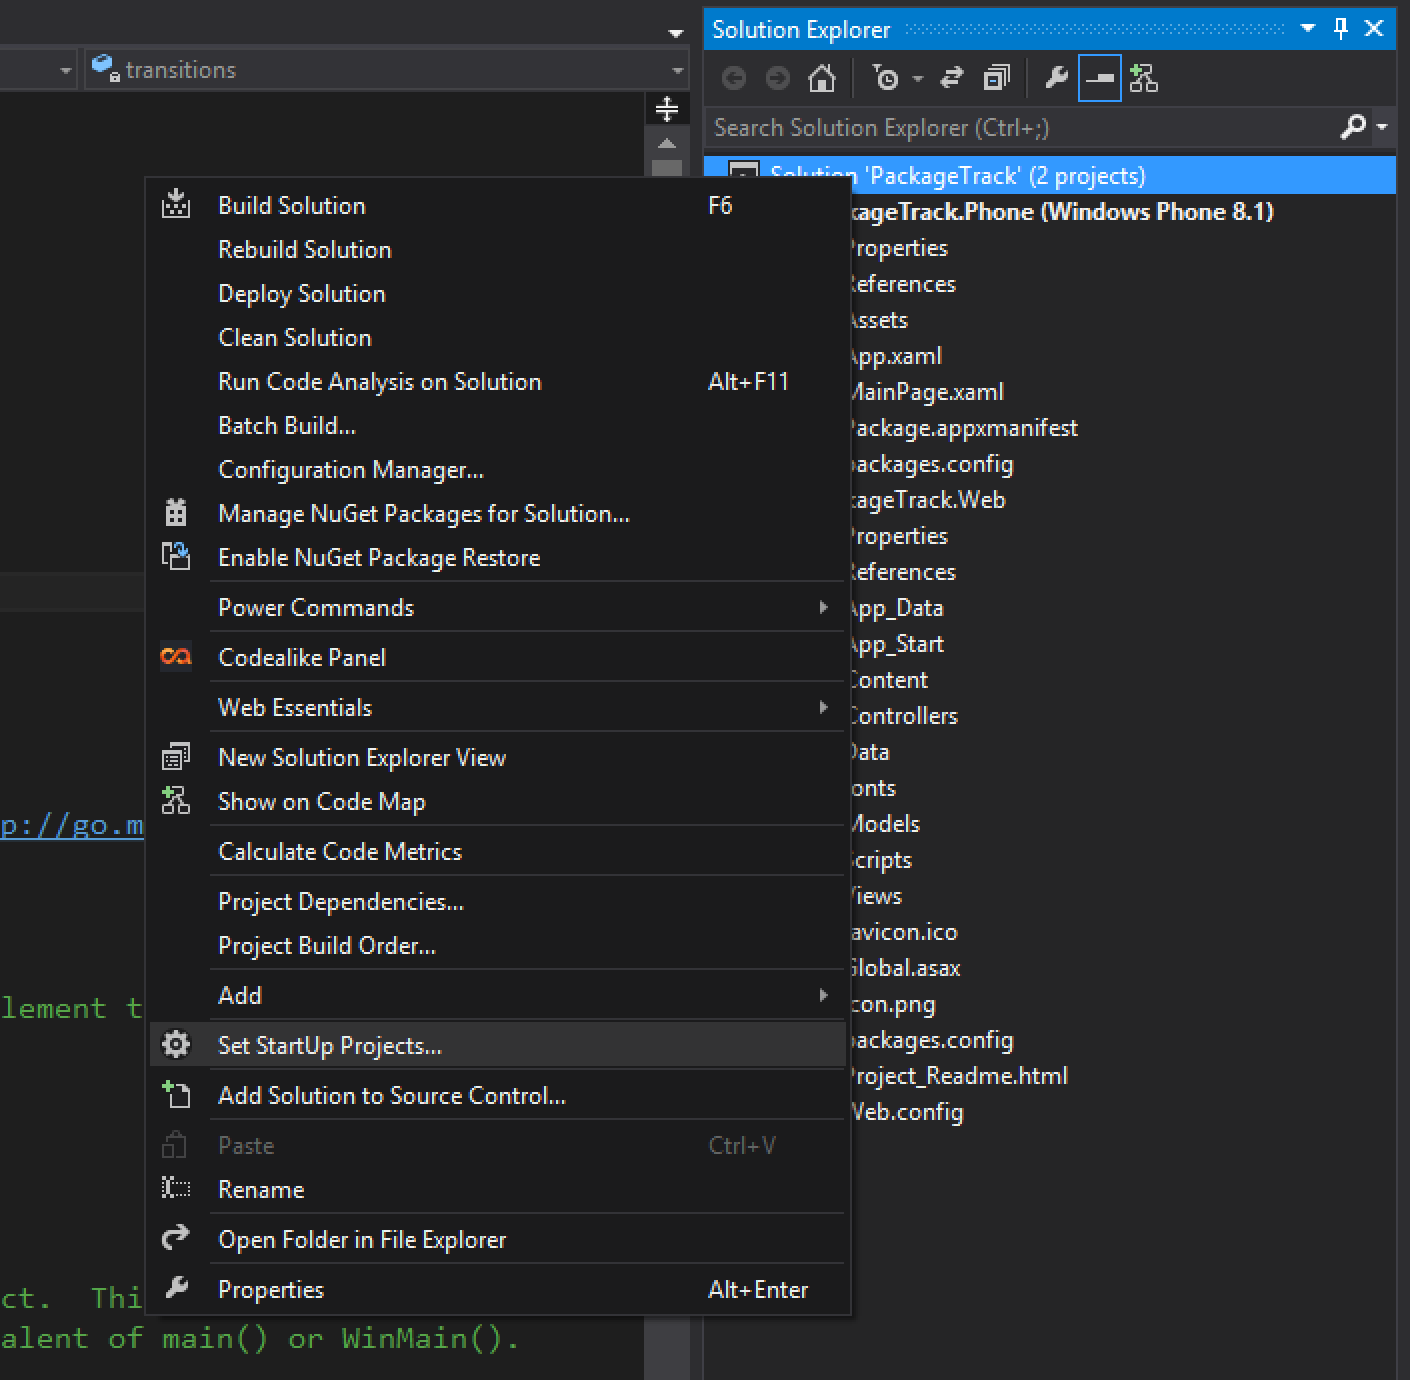
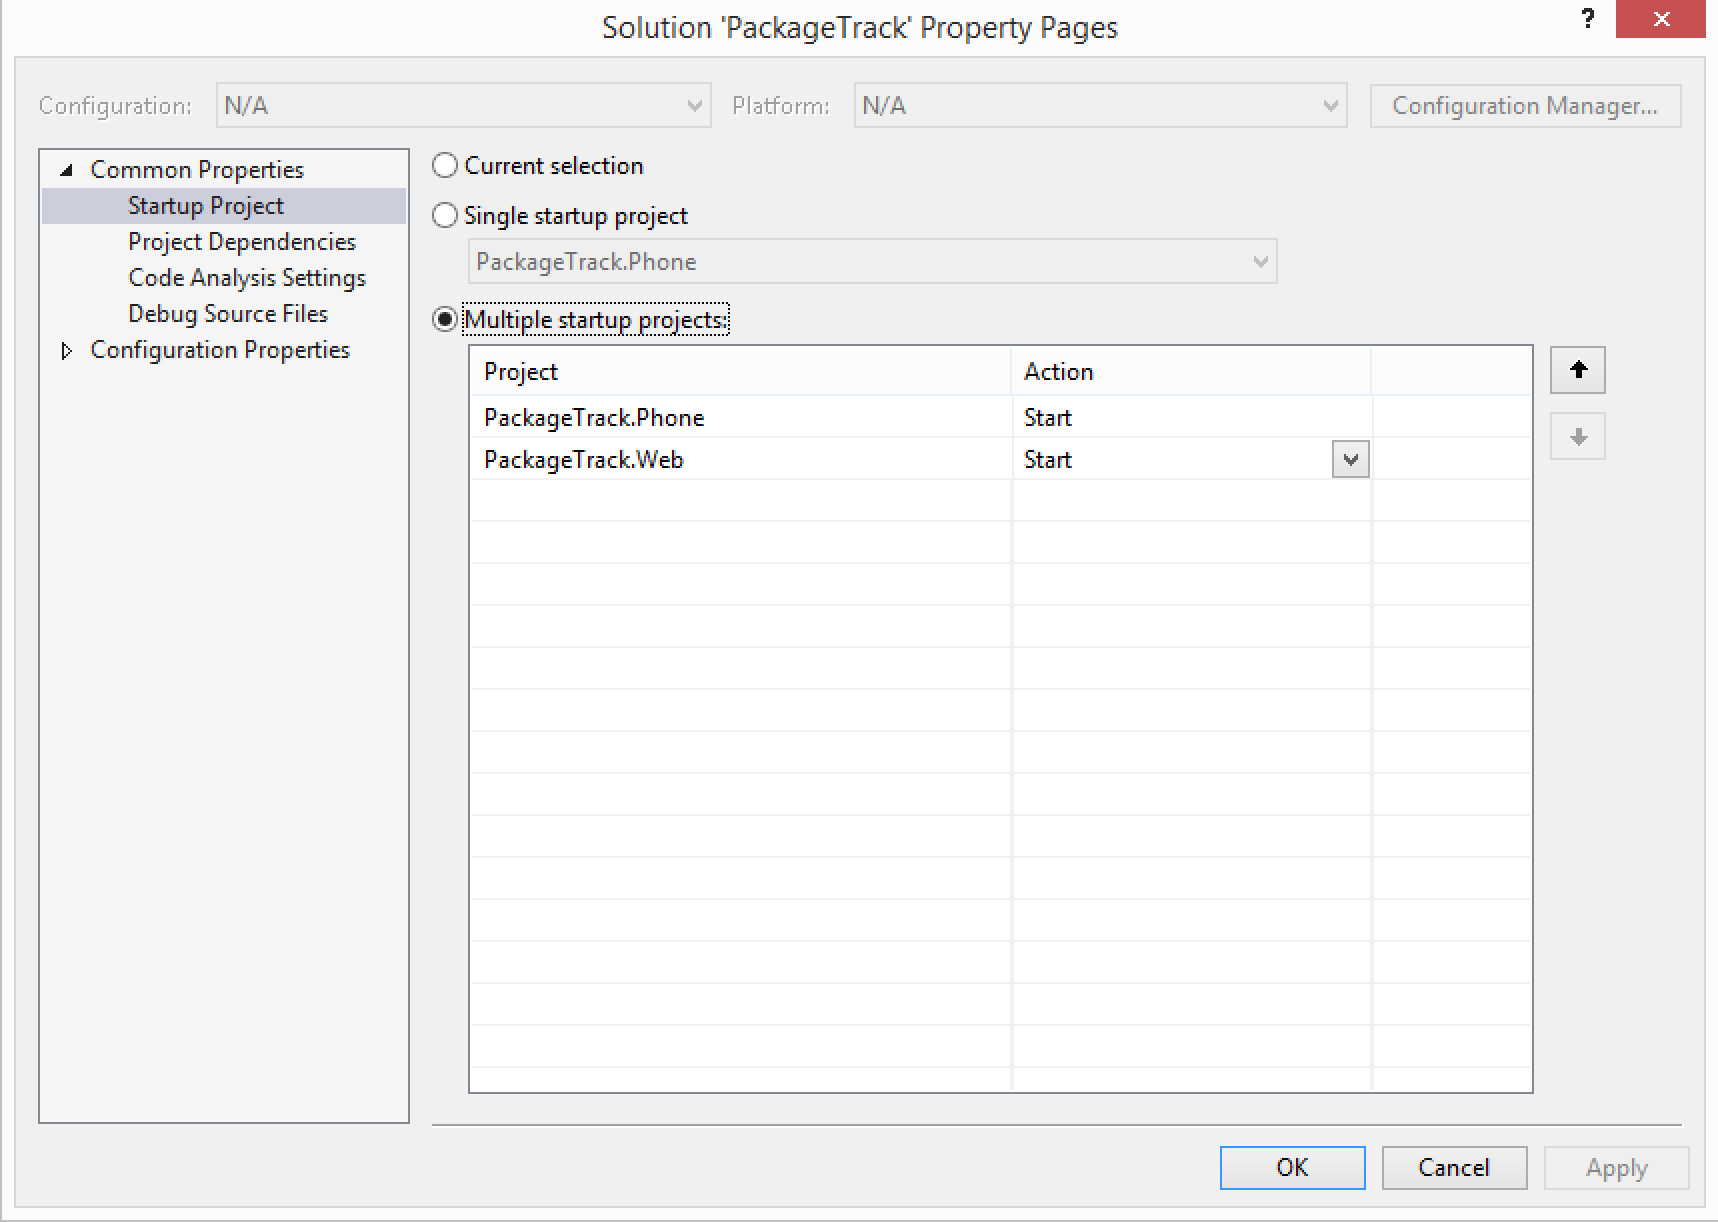
Debug or run your applications now to make sure both projects start.
Build our application UI
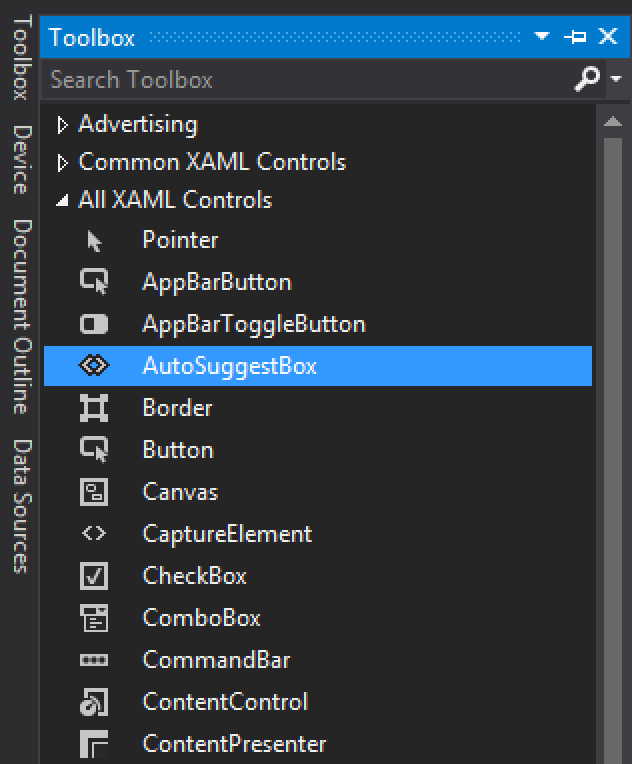
Now that our project and solution are ready to go, we can add some components to our application to build out our UI.
If MainPage.xaml is not open, you will want to open it now. This will load the designer view. The next two steps and screenshots show the two components we want to add to our view. Just drag each of the components from the Toolbox within Visual Studio into your UI as shown below.
Add AutoSuggestBox
Add WebView
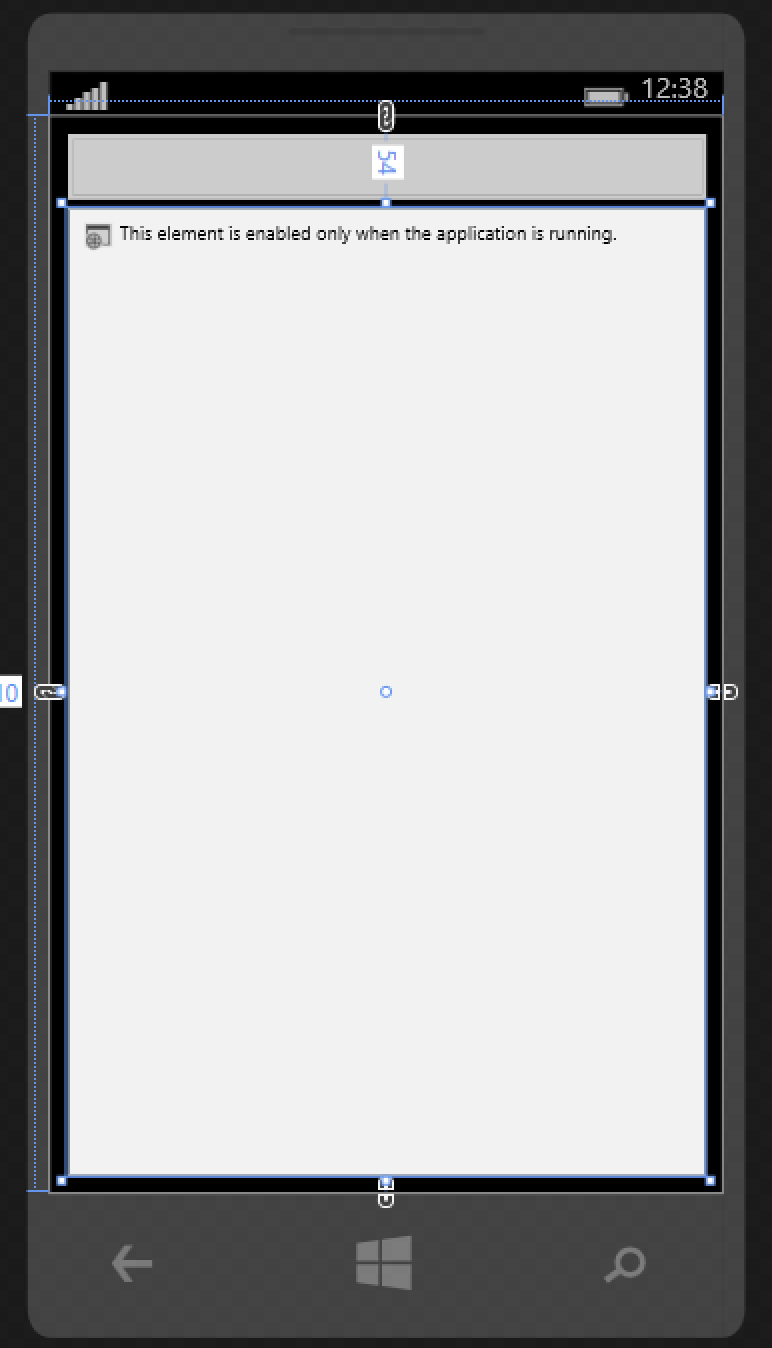
Configure WebView
We need to give our WebView a name so we can reference it within our code. You will need to name it SearchWebView. The following code shows the updated XAML for this change.
1
| |
Configure AutoSuggestBox events
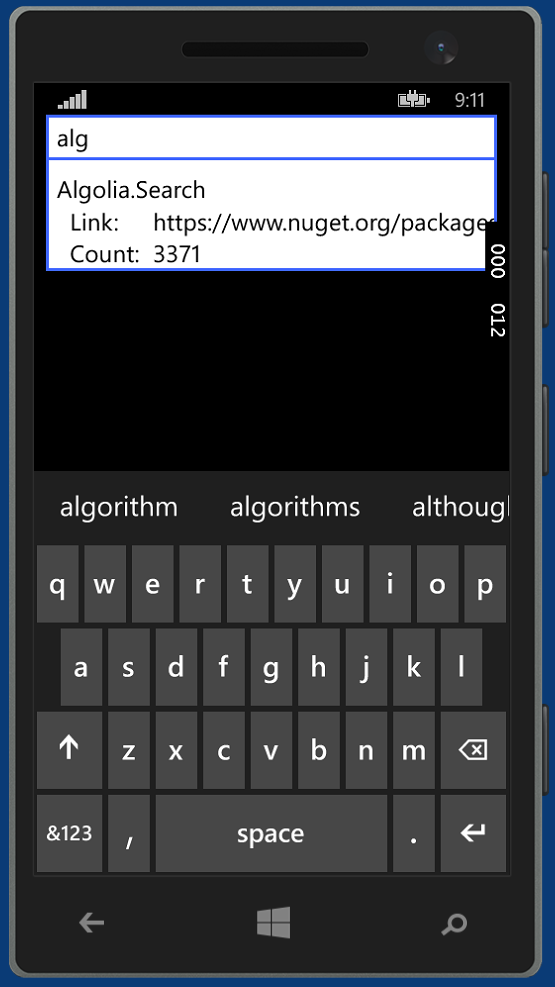
Our AutoSuggestBox is where the user will start typing a search query and will be responsible for searching our index on Algolia. We need to setup two events to handle when the text changes and when a suggestion is selected.
Update the MainPage XAML to the following for the AutoSuggestBox.
1
| |
When adding new event handlers in this fashion, the code behind is automatically created in MainPage.xaml.cs. If they are not there, be sure to add them as follows.
1 2 3 4 5 6 7 8 9 | |
Add Algolia to our application
If you don’t have MainPage.xaml.cs open, open it now.
We are going to add the necessary code to add Algolia search capabilities to our application.
The first thing we need is to add two private members to our MainPage class. These will be an AlgoliaClient and Index.
1 2 | |
Next, we need to instantiate these objects within the constructor. Be sure to change the application id and search only key to the ones you used in the web project.
1 2 3 4 5 6 7 8 9 | |
Finally, be sure to add the necessary using statement.
1
| |
Tie it all together
We now need to create a class that can be used to deserialize the Algolia search responses. Inside MainPage.xaml.cs create the following class. You will notice it defines Name, Link, Count, and objectID. The first 3 are fields we defined in our web application. The last one is the ID that Algolia uses in its indexed data. This is the field we mapped our models ID field to.
Also, you will see we are overriding ToString(). This is because we will be adding each Hit object to our AutoSuggestBox and want to control how the data is shown.
1 2 3 4 5 6 7 8 9 10 11 12 13 14 15 16 17 18 19 | |
Next we need to implement our search code each time a user enters a character in our AutoSuggestBox. Update the AutoSuggestBox event handler for TextChanged as follows.
1 2 3 4 5 6 7 8 9 10 11 12 | |
What we are doing here is creating a new Algolia Query using the entered text. We then issue a search, get back the results as JSON, and convert it to a PackagesResult object. The last thing we do is add the list of Hits as the ItemsSource of our AutoSuggestBox. This will automatically show the results to the user.
Finally, we need to update the SuggestionChosen event for our AutoSuggestBox when a user selects one of the results we showed them. Update it as follows.
1 2 3 4 5 | |
All we are doing here is taking the selected item, reference that items object ID, and then navigating our WebView to that page. The page we are showing is the API endpoint we created in our web application. This is just a simple example of how to tie the two applications together. A more robust approach would be to process the data from the API and build a UI capable of viewing, editing, and deleting the data.
Wrap up
That wraps up this tutorial on adding Algolia to an ASP.NET MVC application along with a Windows Phone 8.1 application. There was a lot going on here, but if you take out the standard stuff for our web and phone application, the Algolia part is very simple and straightforward.
If you found this article or others useful be sure to subscribe to my RSS feed or follow me on Twitter. Also, if there are certain topics you would like me to write on, feel free to leave comments and let me know.
Source code for tutorial can be found here on GitHub.