Welcome to part 4 of the Beer Locker series
In our previous article we ended wtih a functional API capable of creating user accounts, locking down API endpoints, and only allowing access to a user’s own beer locker.
In this part we will dive into creating an OAuth2 server and allowing access to API endpoints for the authorized user or authorized applications. We will do this by integrating OAuth2orize into our application.
Security
I realized I wasn’t explicitly clear about what steps ones should take in regards to security. This article was meant more on how to get an OAuth2 server up and running. When implementing an OAuth2 server you MUST make sure to secure your application. This means running all OAuth2 endpoints over HTTPS and hashing the client secret, authorization code, and access token. All three of those values should be treated the same way you would a password for a user account. If you are unsure about how best to secure your applications, you should seek out the assistance of someone who does.
Application Client
The first thing we need to do is add a new model, controller, and endpoints to allow us to create new application clients. An application client is what would request access to a user account. Perhaps something like a service that wants to help manage your beer collection to notify you when you are running low.
Create a new file called client.js in the models directory and add the following code to it.
1 2 3 4 5 6 7 8 9 10 11 12 13 | |
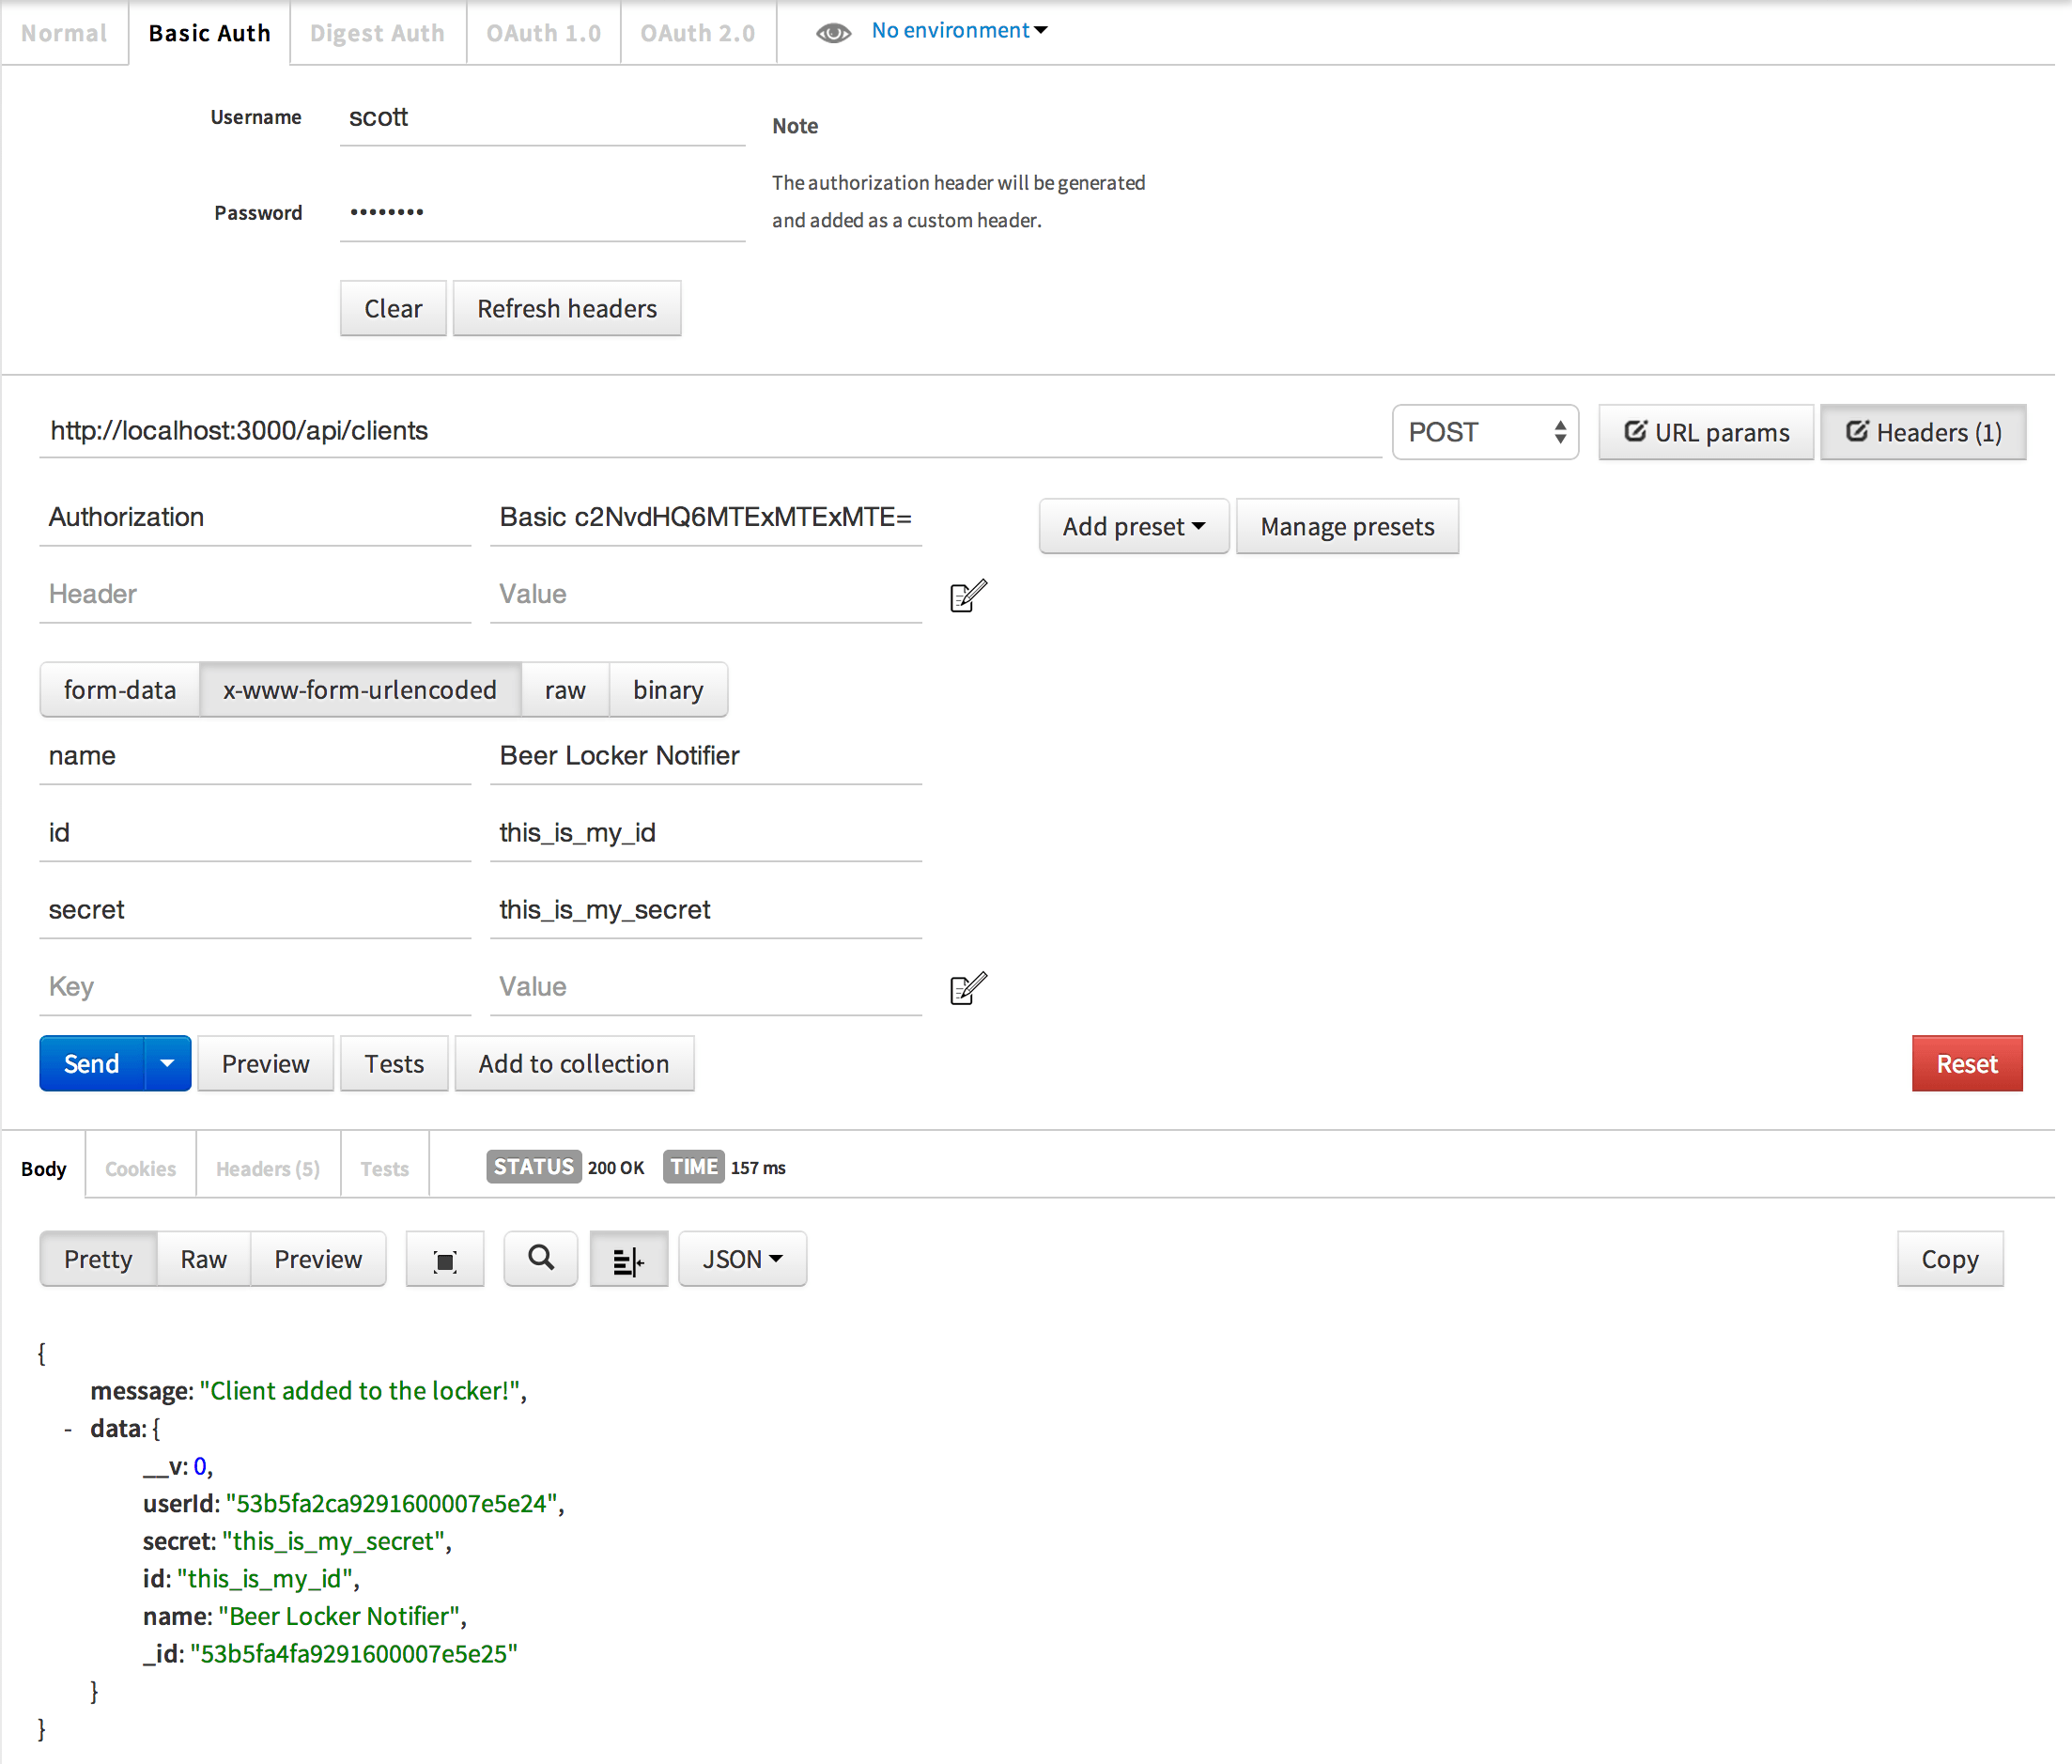
There isn’t too much going on here that differs from what we already did in previous articles. We have a name to help identify the application client. The id and secret are used as part of the OAuth2 flow and should always be kept secret. In this post we aren’t adding any encryption, but it would be a good practice to hash the secret at the very least. Finally we have a userId field to identify which user owns this application client.
You could also consider auto generating the client id and secret in order to enforce uniqueness, randomness, and strength.
The next thing we will add is the controller to facilitate adding and viewing application clients. Create a new file called client.js in the controllers directory and add the following code to it.
1 2 3 4 5 6 7 8 9 10 11 12 13 14 15 16 17 18 19 20 21 22 23 24 25 26 27 28 29 30 31 32 33 | |
These two methods will allow us to create new application clients and get all existing ones for the authenticated user.
Finally, in the server.js file we need to require the new controller and add some new routes for the two endpoints. The new route can be added just after the /users route.
1 2 3 4 5 6 7 8 | |
Using Postman, let’s go ahead and create a new application client. If for some reason you forgot your password for your user, you should make a new one by posting to the /users endpoint with username and password.
Authenticate our application client
We already created the ability to authenticate a user in our previous article using the BasicStrategy. We need to do the same here so we can lock down our token exchange endpoint which we will implement later.
Update the controllers/auth.js file to require the Client model, add a new BasicStrategy to passport, and setup an export that can be used to verify the client is authenticated.
1 2 3 4 5 6 7 8 9 10 11 12 13 14 15 16 17 18 19 20 21 | |
The one thing to note here is that when we call passport.use() we are not just supplying a BasicStrategy object. Instead we are also giving it the name client-basic. Without this, we would not be able to have two BasicStragies running at the same time.
The actual implementation for our new BasicStrategy is to lookup a client using the supplied client id and verify the password is correct.
Authorization Codes
We need to create another model that will store our authorization codes. These are the codes generated in the first part of the OAuth2 flow. These codes are then used in later steps by getting exchanged for access tokens.
Create a new file called code.js in the models directory and add the following code to it.
1 2 3 4 5 6 7 8 9 10 11 12 13 | |
It is a pretty simple model with the value field used to store our authorization code. redirectUri is there to store the redirect uri supplied in the initial authorization process so we can add a bit more security later on to make sure the token exchange is legitimate. The userId and clientId fields are used to know what user and application client own this code.
It is also worth noting, that to be extra secure, you should consider hashing the authorization code.
Access Tokens
Now we need to create the model that will store our access tokens. Access tokens are the final step in the OAuth2 process. With an access token, an application client is able to make a request on behalf of the user. We will implement the code a little later that creates and validates them.
Create a new file called token.js in the models directory and add the following code to it.
1 2 3 4 5 6 7 8 9 10 11 12 | |
The value field will be of the most interest here. It is the actual token value used when accessing the API on behalf of the user. The userId and clientId fields are used to know what user and application client own this token.
Just like we did for user passwords, you should implement a strong hashing scheme for the access token. Never store them as plain text as we are in this example.
Authentication using access tokens
Earlier, we added a second BasicStrategy so we can authenticate requests from clients. Now we need to setup a BearerStategy which will allow us to authenticate requests made on behalf of users via an OAuth token. This is done via the Authorization: Bearer <access token> header.
First we need to install another npm package that will provide us with the BearerStrategy for Passport.
1
| |
Update the controllers/auth.js file to require the passport-http-bearer package and Token model, add a new BearerStrategy to passport, and setup an export that can be used to verify the application client request is authenticated.
1 2 3 4 5 6 7 8 9 10 11 12 13 14 15 16 17 18 19 20 21 22 23 24 25 26 27 28 29 | |
This new strategy will allow us to accept requests from application clients using OAuth tokens and for us to validate those requests.
Simple UI for granting application client access
Up to this point in our series, we have not added any UI. We need to add a simple page with a form that will allow a user to grant or deny access to their account for any application client requesting access.
There are a lot of template engines to pick from like jade, handlebars, ejs, and more.For this series, I went with ejs.
First, we need to install the ejs npm package.
1
| |
Next, we need to update our express application to tell it to use ejs as its view engine. Add the following require and app.set statements in server.js.
1 2 3 4 5 6 7 8 9 | |
Finally, we need to create our view that will let the user grant or deny the application client access to their account.
Create a new directory called views and add a file named dialog.ejs.
Add the following code to the dialog.ejs file.
1 2 3 4 5 6 7 8 9 10 11 12 13 14 15 16 17 18 19 20 | |
We will come back to this page later as we do a full walkthrough of how everything works. For now, we have this in place and can move on to the next piece.
Enable sessions for our express application
OAuth2orize requires session state for the express application in order to properly complete the authorization transaction. In order to do this, we need to install the express-session package.
1
| |
Next we need to require the package and use it in our express application.
Update server.js with the following code.
1 2 3 4 5 6 7 8 9 10 11 12 13 14 15 16 17 18 | |
Create our OAuth2 controller
We are finally ready to create our OAuth2 controller that will facilitate the OAuth2 flow.
First, install the oauth2orize package.
1
| |
Next, create a new file called oauth2.js in the controllers directory. We will add the code to this file in steps.
Load required packages
1 2 3 4 5 6 | |
Create our OAuth2 server
1 2 | |
Register serialization and deserialization functions
1 2 3 4 5 6 7 8 9 10 11 12 | |
When a client redirects a user to user authorization endpoint, an authorization transaction is initiated. To complete the transaction, the user must authenticate and approve the authorization request. Because this may involve multiple HTTP request/response exchanges, the transaction is stored in the session.
Register authorization code grant type
1 2 3 4 5 6 7 8 9 10 11 12 13 14 15 16 17 | |
OAuth 2.0 specifies a framework that allows users to grant client applications limited access to their protected resources. It does this through a process of the user granting access, and the client exchanging the grant for an access token.
We are registering here for an authorization code grant type. We create a new authorization code model for the user and application client. It is then stored in MongoDB so we can access it later when exchanging for an access token.
Exchange authorization codes for access tokens
1 2 3 4 5 6 7 8 9 10 11 12 13 14 15 16 17 18 19 20 21 22 23 24 25 26 27 28 | |
What we are doing here is registering for the exchange of authorization codes for access tokens. We first look up to see if we have an authorization code for the one supplied. If we do we perform validation to make sure everything is as it should be. If all is well, we remove the existing authorization code so it cannot be used again and create a new access token. This token is tied to the application client and user. It is finally saved to MongoDB.
User authorization endpoint
1 2 3 4 5 6 7 8 9 10 11 12 13 14 | |
This endpoint, initializes a new authorization transaction. It finds the client requesting access to the user’s account and then renders the dialog ejs view we created eariler.
User decision endpoint
1 2 3 4 | |
This endpoint is setup to handle when the user either grants or denies access to their account to the requesting application client. The server.decision() function handles the data submitted by the post and will call the server.grant() function we created earlier if the user granted access.
Application client token exchange endpoint
1 2 3 4 5 | |
This endpoint is setup to handle the request made by the application client after they have been granted an authorization code by the user. The server.token() function will initiate a call to the server.exchange() function we created earlier.
Utility functions to generate unique identifiers
1 2 3 4 5 6 7 8 9 10 11 12 13 14 15 | |
Add routes to OAuth2 endpoints
Now that we have the controller made for our OAuth2 endpoints, we need to update our express application to add the necessary routes to those endpoints.
In server.js require the new oauth2 controller and add a few new routes.
1 2 3 4 5 6 7 8 9 10 11 12 | |
Access token authorization on API endpoints
At this point we have everything in place for a fully functioal OAuth2 server. The last piece we need is to update our endpoints that require authorization. Currently, we are authorizing with the BasicStrategy which uses username/password. We need to update that to also allow it to use the BearerStrategy which will allow the use of the access token.
Change the exports.isAuthenticated call in controllers/auth.js to use either basic or bearer strategies.
1
| |
We are already using the isAuthenticated function on our endpoints so this change will allow authorization with usernamne/password and access tokens.
Let’s use our OAuth2 server!
That was a lot of code! Still far less than it would have been had we not used OAuth2orize.
Now it is time to actually try it out.
Open up your favorite web browser and browse to: http://localhost:3000/api/oauth2/authorize?client_id=this_is_my_id&response_type=code&redirect_uri=http://localhost:3000. If you used a different client id, then change it in the query string. Also, if you are running on a different port, be sure to change that in both places. When prompted, enter your username and password.
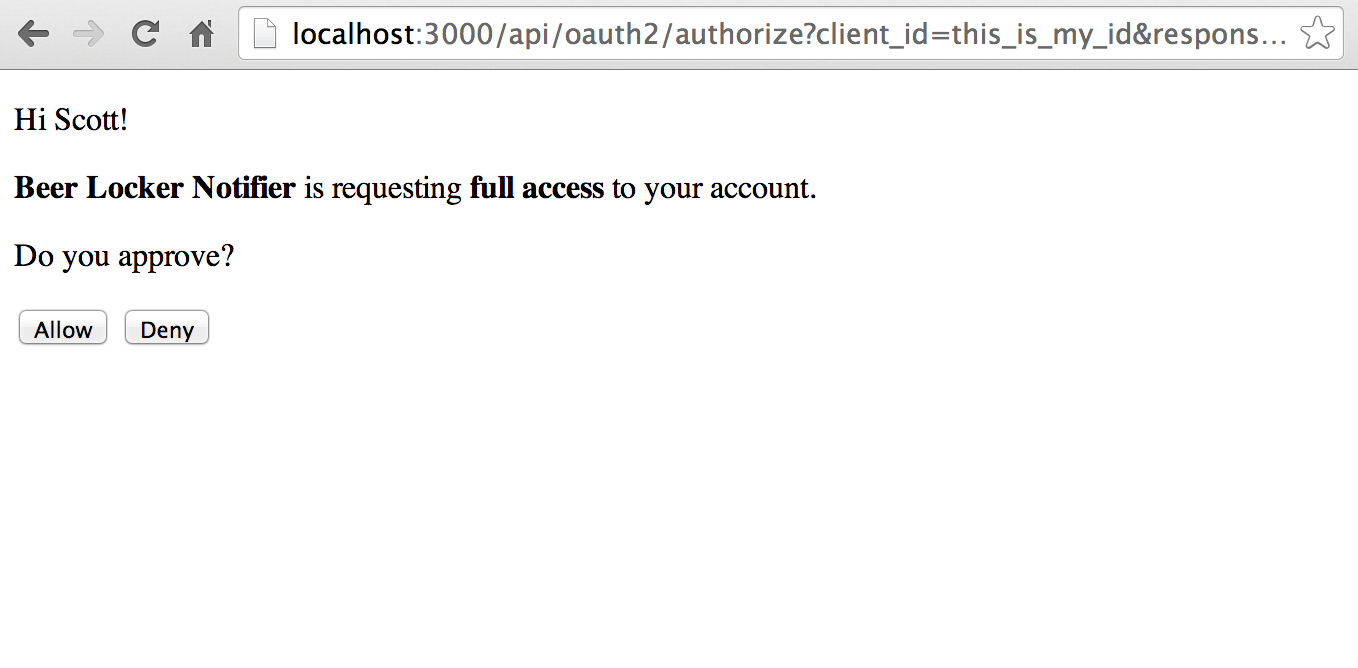
You can test it out by clicking Deny if you want and should see it not continue the OAuth2 flow. Go ahead and click Allow to continue to the next step.

So why did we get a 404? This is part of the tutorial where we are hacking things together a bit. Normally with OAuth2 you would have an endpoint in the application requesting access to a user’s account. That is the query string redirect_uri that we supplied. So when a user grants access, that URI is requested and passed the authorization code. This then allows the requesting application to exchange that code for an access token.
To continue this tutorial, we will fake an application server using Postman. Go ahead and copy the authorization code from the query string code. Mine in this example would be S7VlbvRQW1aIC5X5.
In Postman, we will want to POST to http://localhost:3000/api/oauth2/token, set the Basic Auth username and password to the client id and client secret for your application client, add set post data values code, grant_type, and redirect_uri. Code needs to be set the code you copied from the browser request. Grant_type needs to be set to authorization_code because that is the type we are using. Redirect_uri needs to be set to the same redirect_uri you used in the authorization code request.
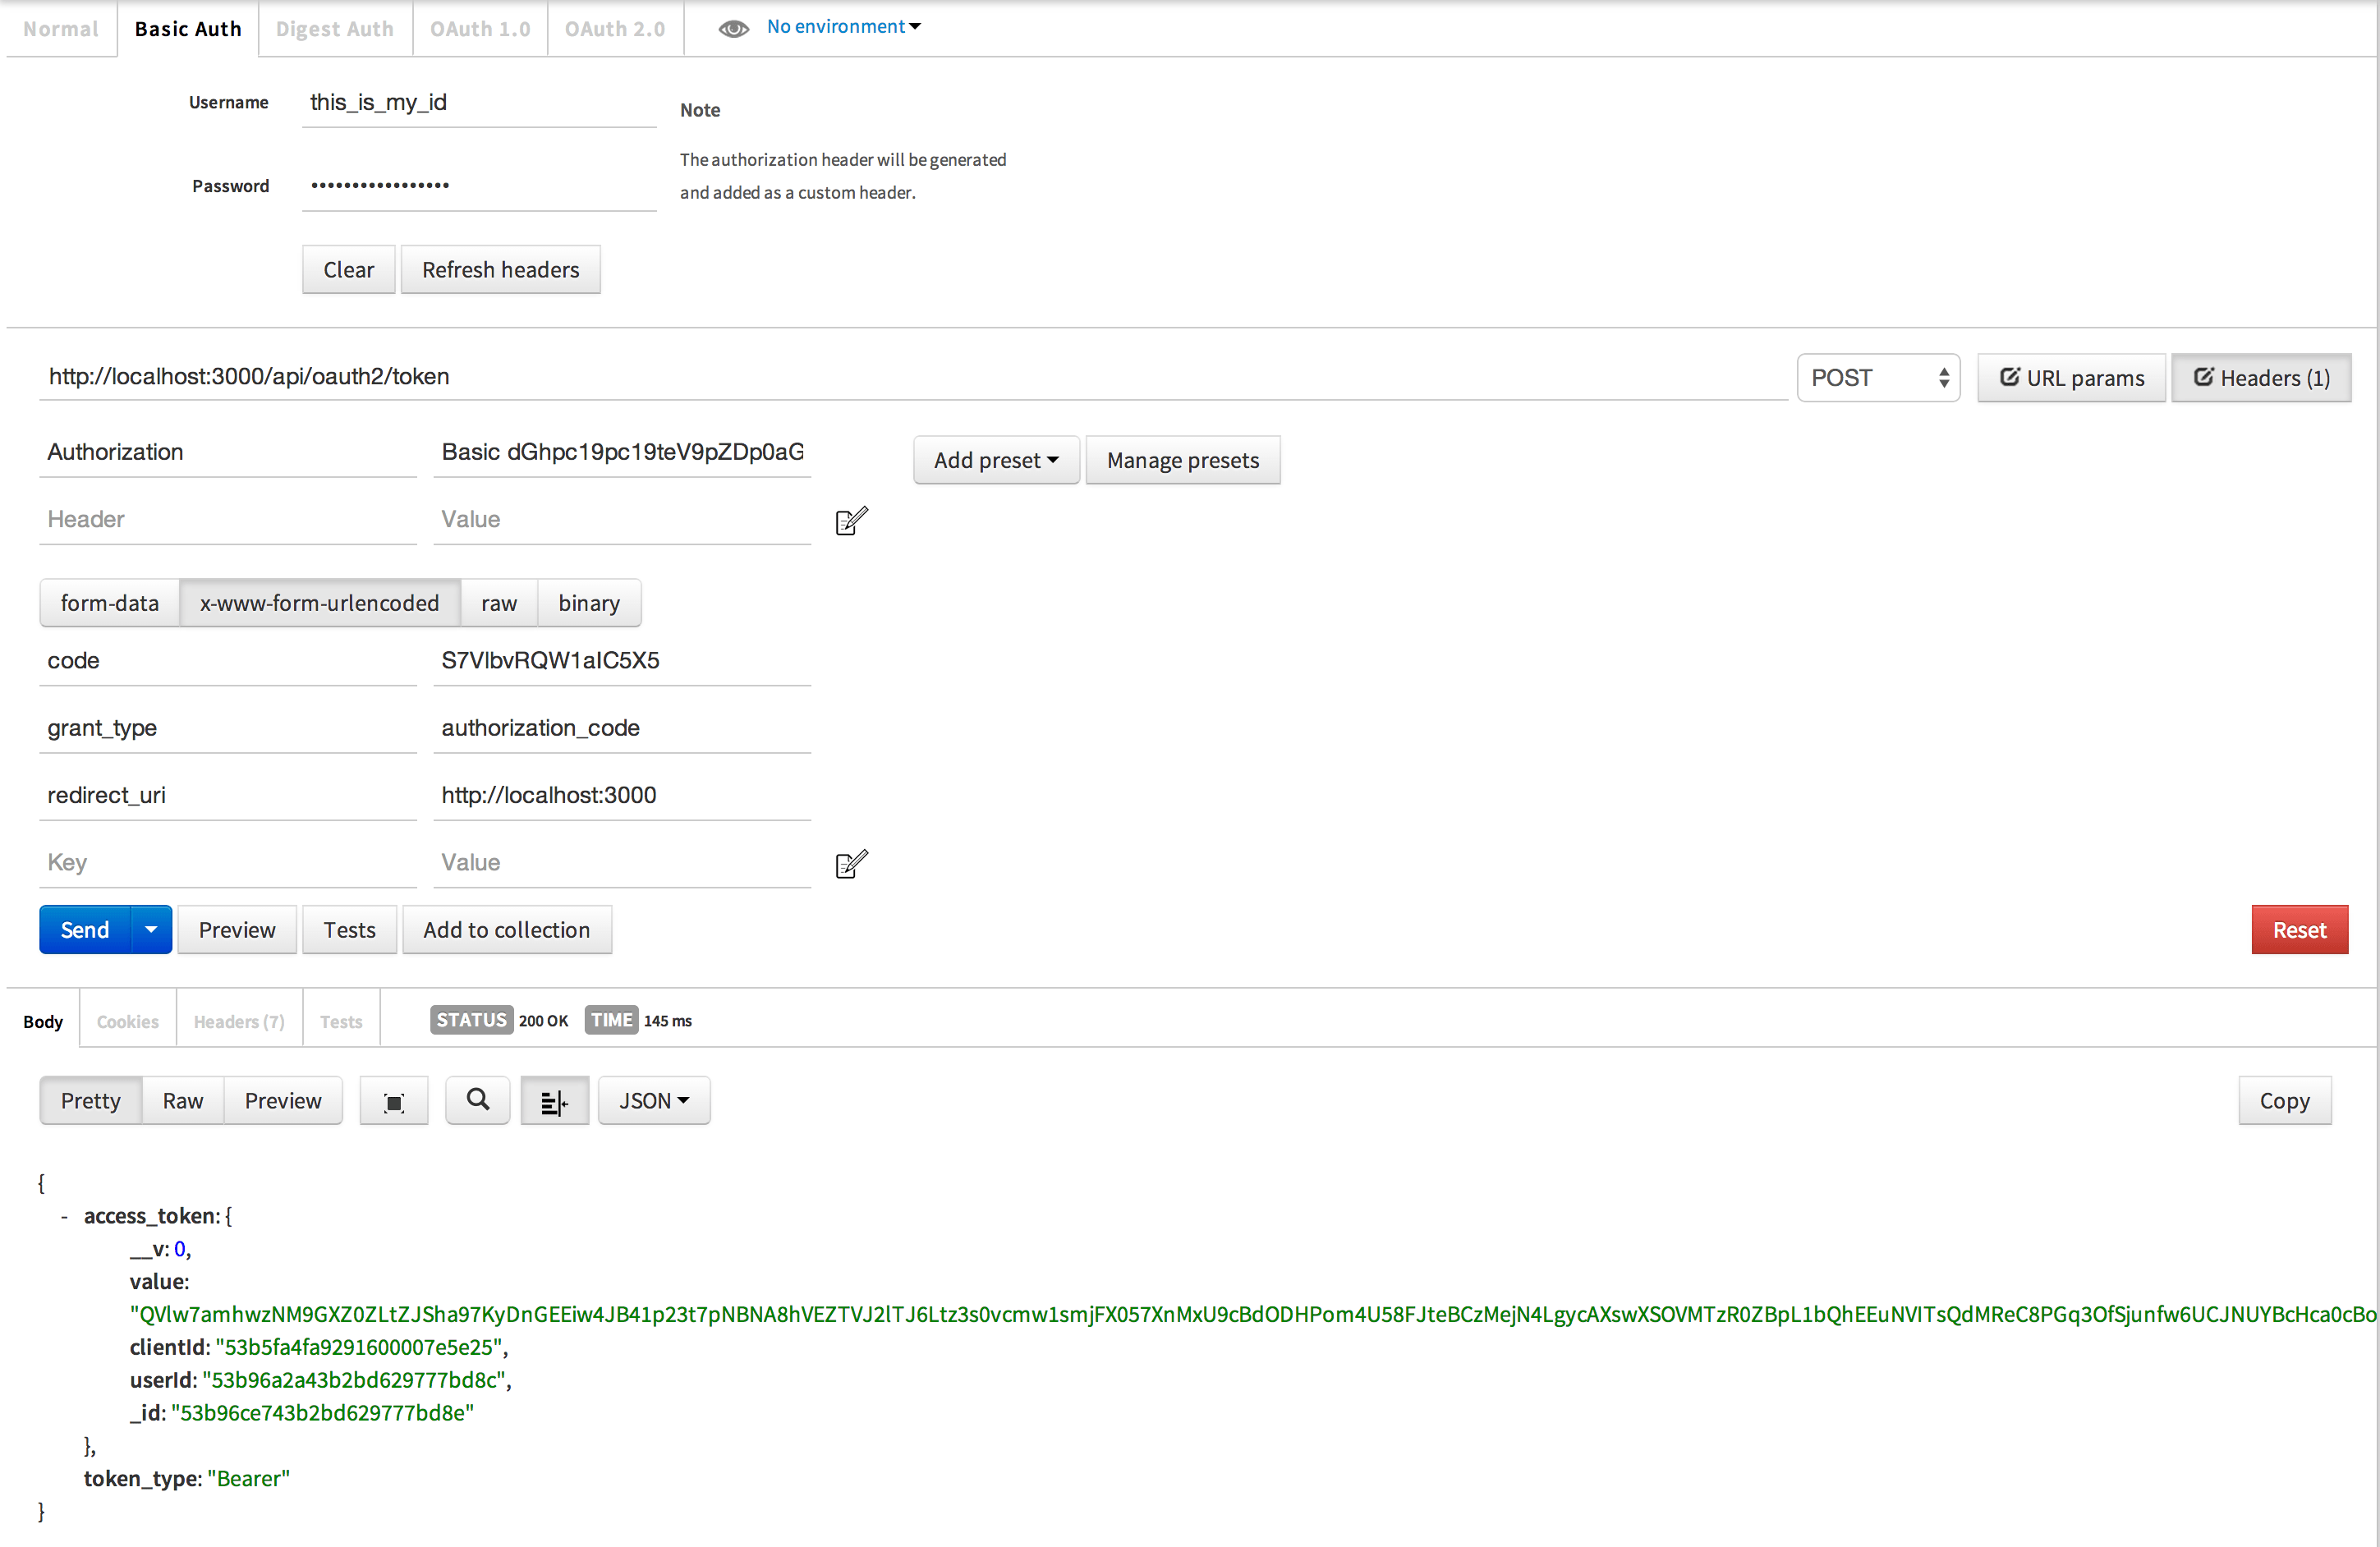
See that value field in the response access_token object? That is our access token which we can now use to make API requests on behalf of the user!
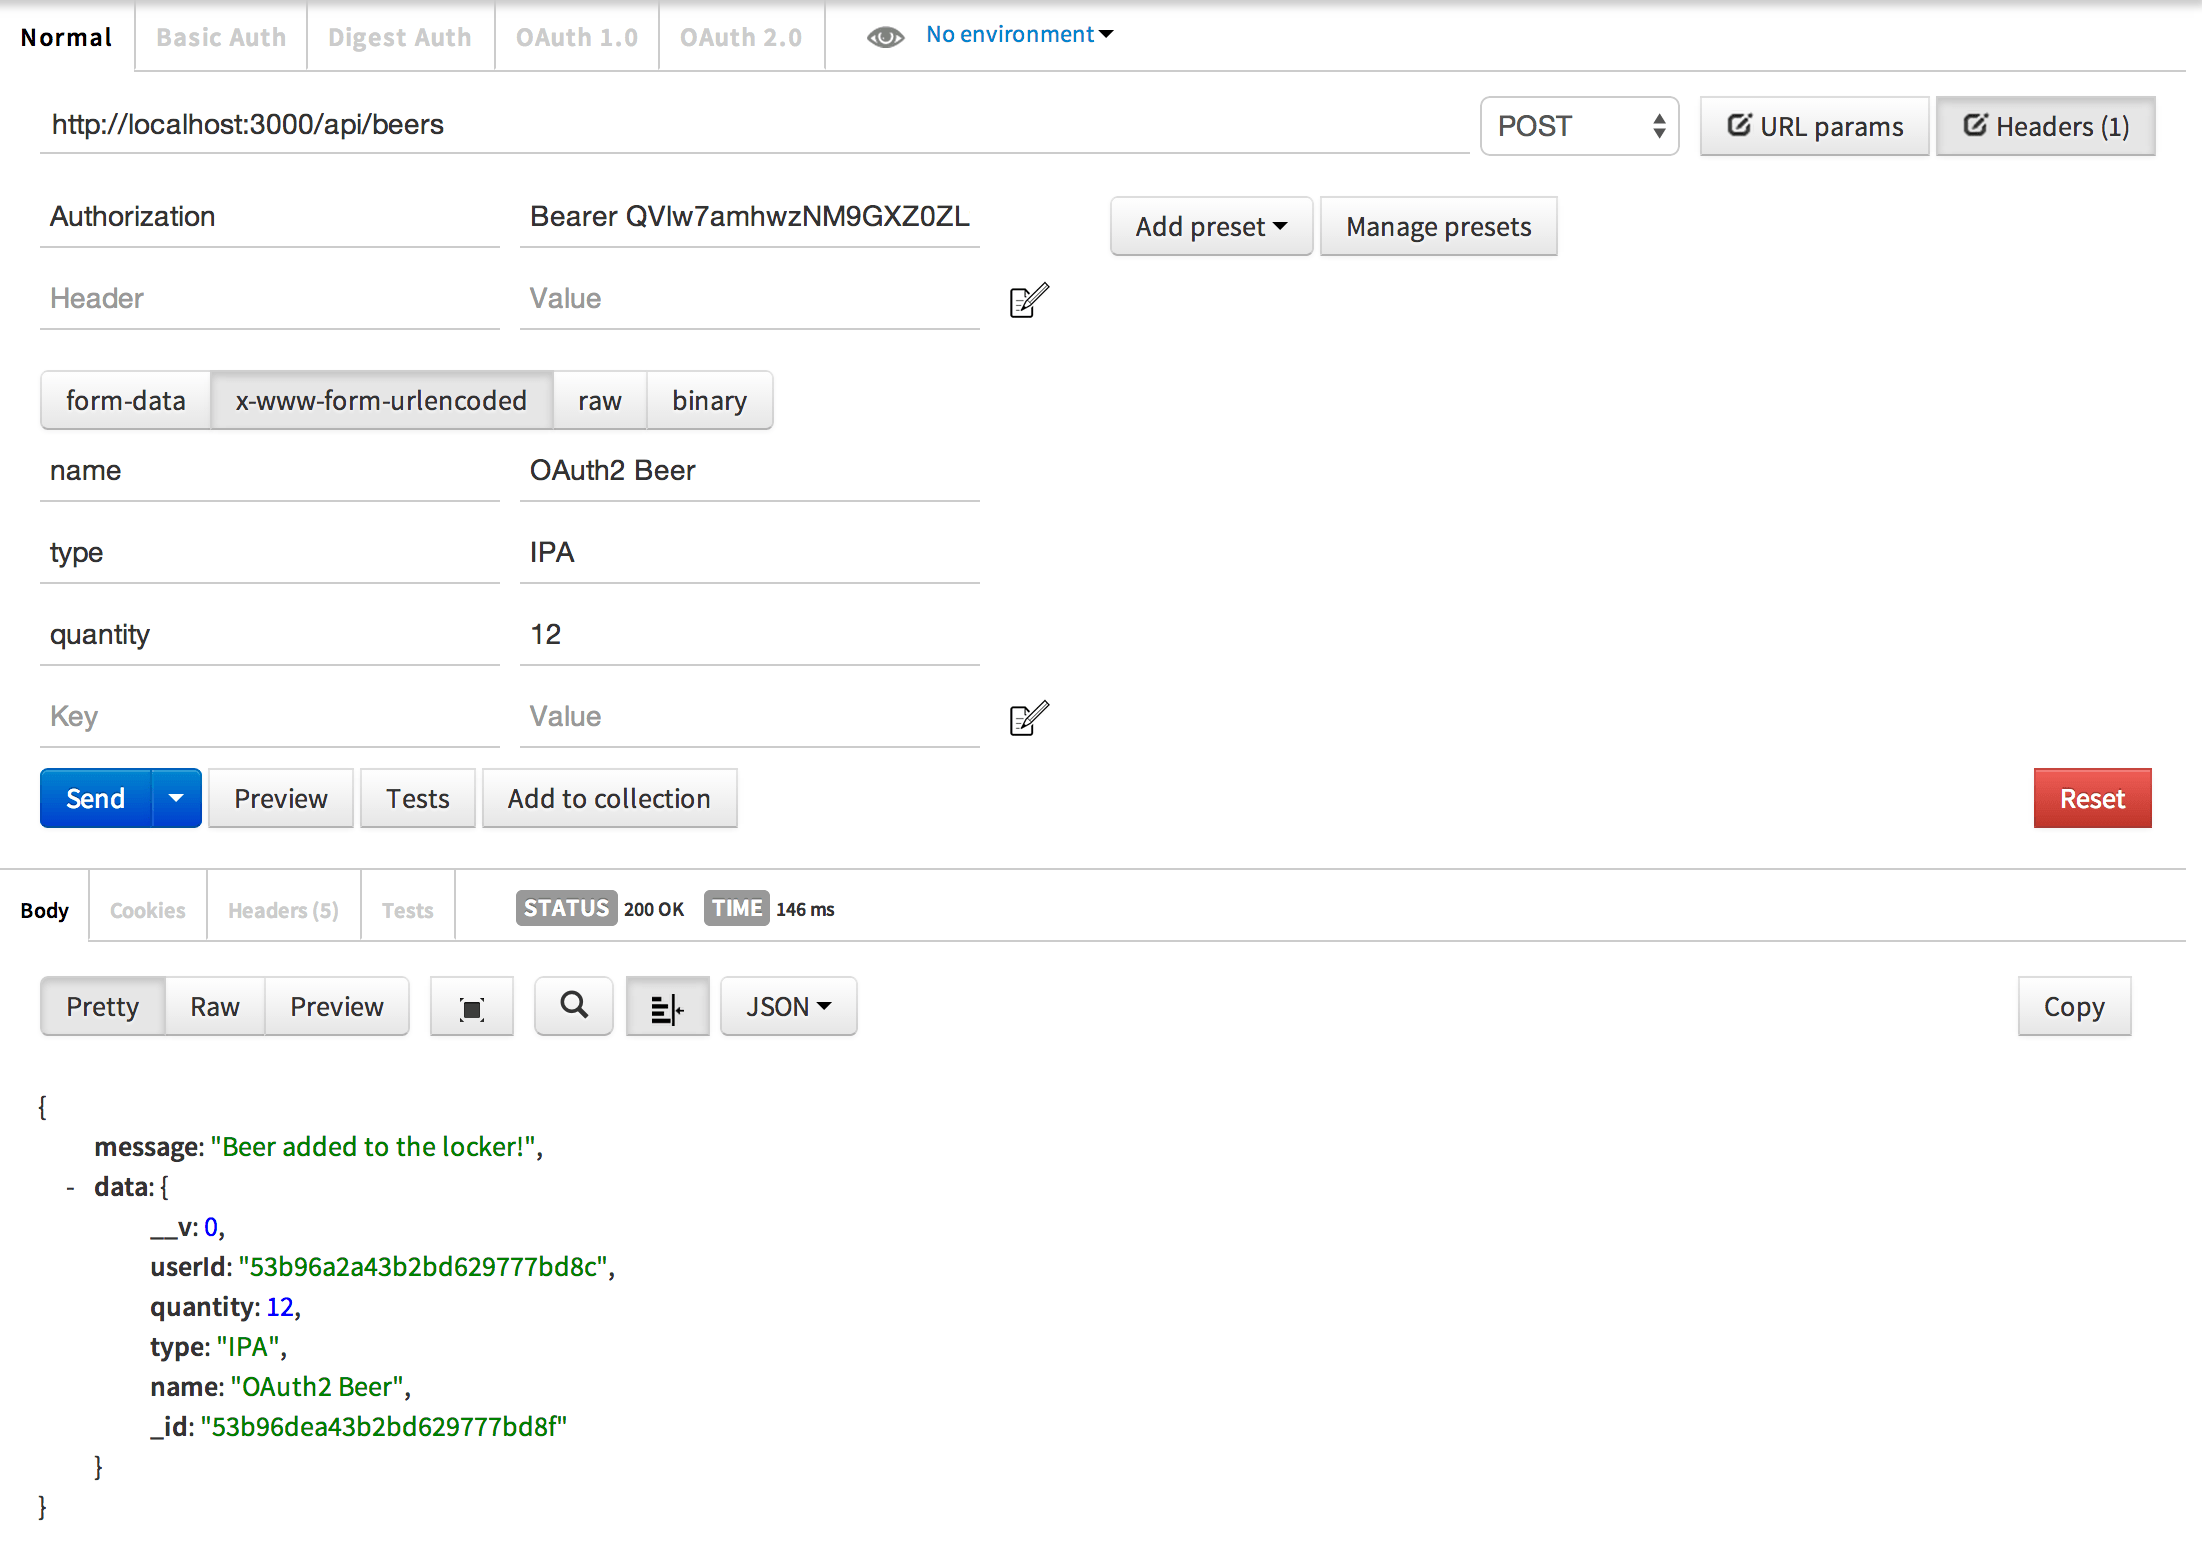
Let’s test our access token by making a request to our API endpoints.
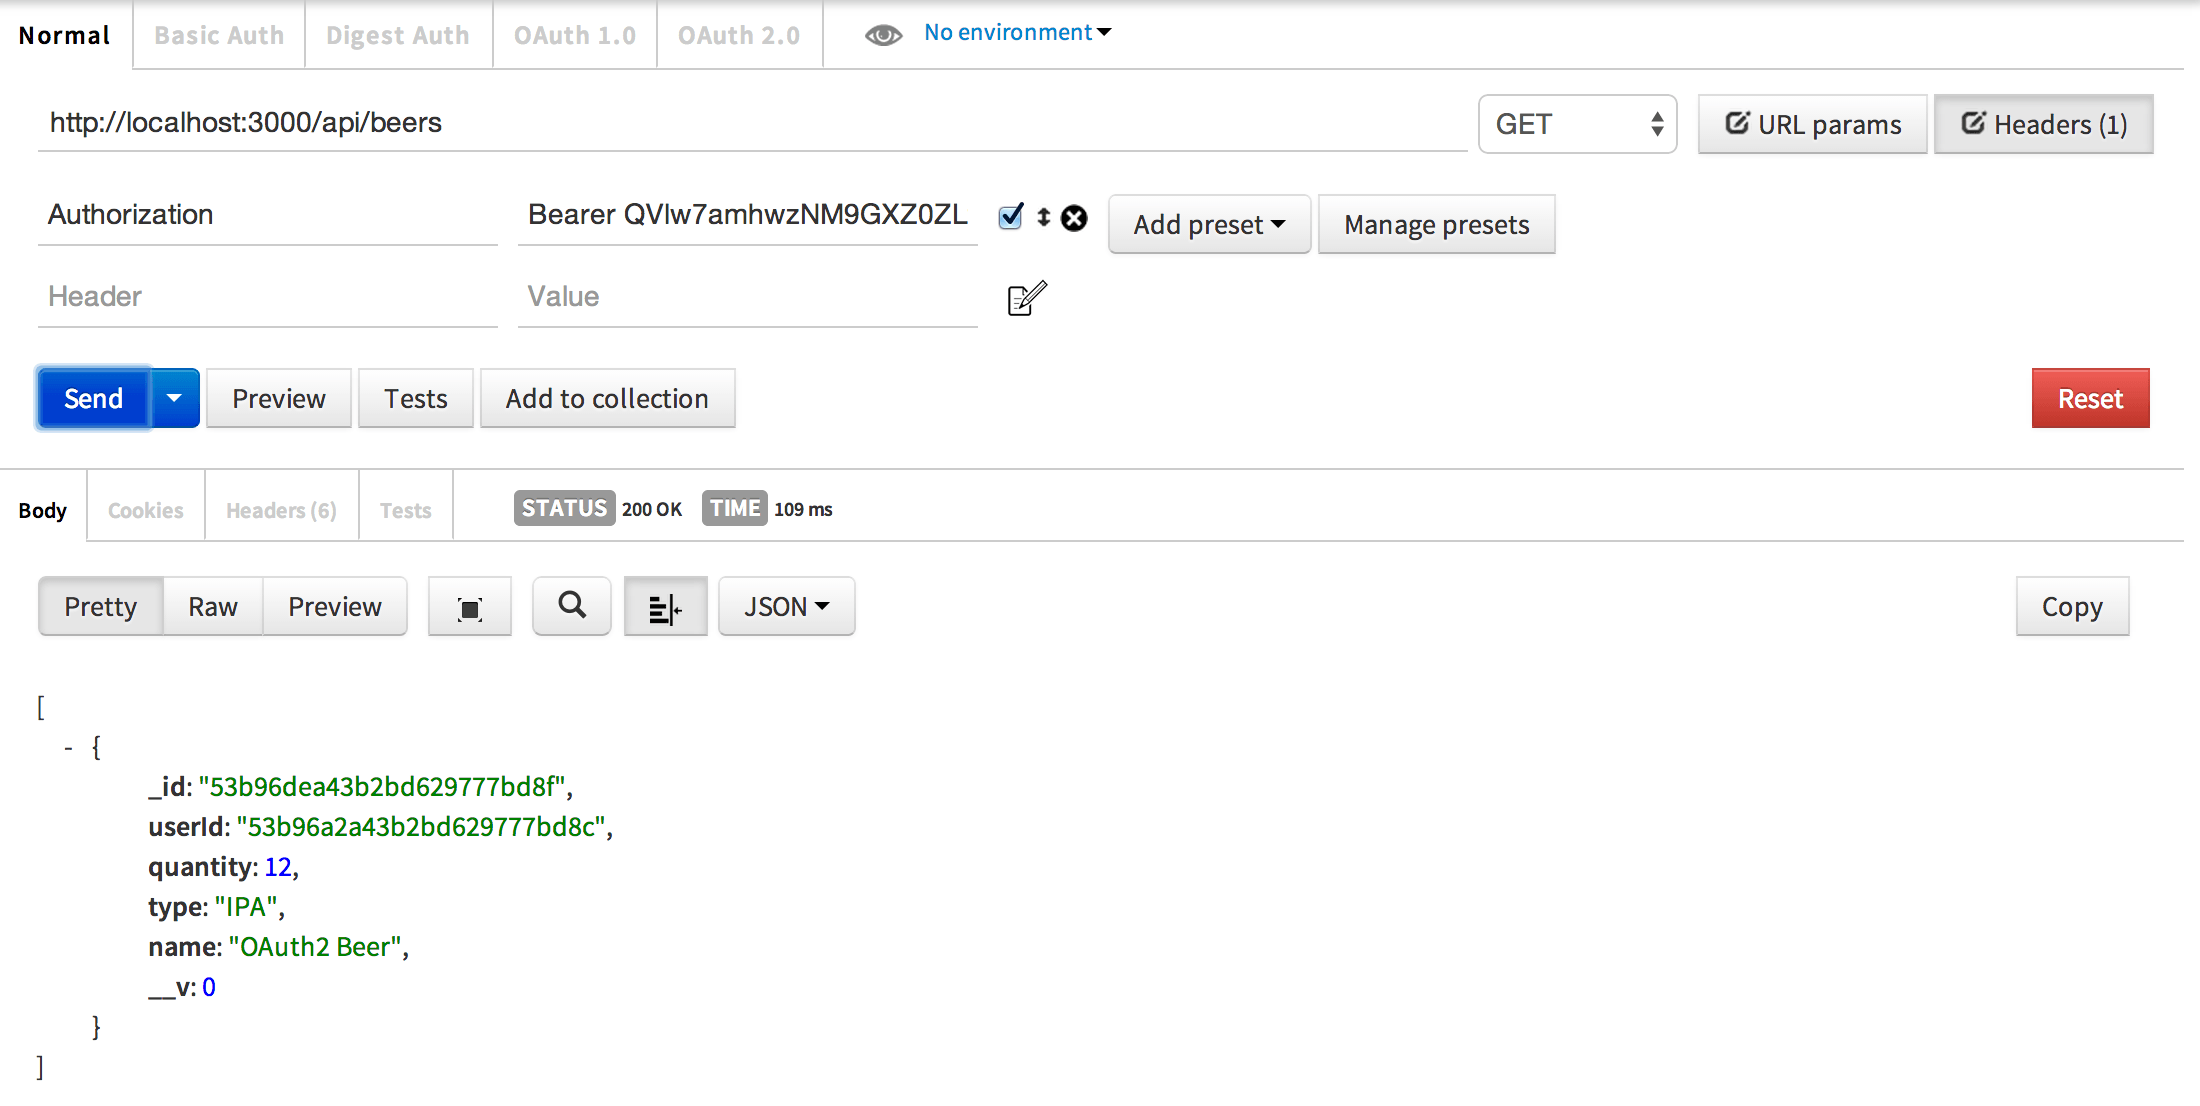
All you have to do is make GET, POST, PUT, or DELETE requests to the API endpoints we made in earlier tutorials. The only difference is you don’t have to supply a username or password. Instead, you will add an Authorization header with the value set to Bearer <access token>
Add beer to the user’s locker
Get beer from the user’s locker
Feel free to play around a bit. You should be able to alter the access token and find you are unauthorized. Switch back to username and password to verify the user still has access.
Wrap up
You now have a fully functional OAuth2 server done with just a little bit of work. OAuth2orize is an amazing library that makes building our server very straightfoward.
I have a lot more tutorials coming so be sure to subscribe to my RSS feed or follow me on Twitter. Also, if there are certain topics you would like me to write on, feel free to leave comments and let me know.
Source code for this part can be found here on GitHub.