Scott Smith

Blog Tutorials Projects Speaking RSS

Beer Locker: Building a RESTful API With Node - Passport

Welcome to part 3 of the Beer Locker series

  1. Getting started
  2. CRUD
  3. Passport
  4. OAuth2 Server
  5. Digest
  6. Username & Password

In our previous article we ended wtih a fairly functional API capable of adding, removing, updating, and viewing beer.

In this part we will dive into creating user accounts and authentication using Passport. By the end of this article you will have learned how to add user accounts, implement authentication, and control access to beer lockers.

Passport

So what is Passport? Here is the official description from their site:

“Passport is authentication middleware for Node.js. Extremely flexible and modular, Passport can be unobtrusively dropped in to any Express-based web application. A comprehensive set of strategies support authentication using a username and password, Facebook, Twitter, and more.”

What this means is that Passport is middleware that can be added to the Express just like we did for the body-parser package with app.use().

Some of the great features provided by Passport are:

  • 140+ authentication strategies
  • Single sign-on with OpenID and OAuth
  • Easily handle success and failure
  • Supports persistent sessions
  • Dynamic scope and permissions
  • Pick and choose required strategies
  • Implement custom strategies
  • Does not mount routes in application
  • Lightweight code base

Authentication Strategies

As of writing this blog post, Passport has 140+ authenication strategies available for use in your application.

What these strategies provide are nicely encapsulated npm packages that abstract out some of the complexities with intergrating OAuth or OpenID for API services like Twitter, Facebook, Google, etc.

You can find the full list here.

For this tutorial we will be using the Basic strategy to support Basic Authentication in the calls to our API endpoints.

Clean Up

We need to do a bit of code cleanup and restructuring before continuing otherwise our codebase will become very messy and hard to follow.

You can find the udpated version of the code here on GitHub.

If you would like to make the changes yourself, create a new folder in your application called controllers and add a new file beer.js to that folder with the following code:

1
2
3
4
5
6
7
8
9
10
11
12
13
14
15
16
17
18
19
20
21
22
23
24
25
26
27
28
29
30
31
32
33
34
35
36
37
38
39
40
41
42
43
44
45
46
47
48
49
50
51
52
53
54
55
56
57
58
59
60
61
62
63
64
65
66
67
68
69
70
71
72
73
74
// Load required packages
var Beer = require('../models/beer');

// Create endpoint /api/beers for POSTS
exports.postBeers = function(req, res) {
  // Create a new instance of the Beer model
  var beer = new Beer();

  // Set the beer properties that came from the POST data
  beer.name = req.body.name;
  beer.type = req.body.type;
  beer.quantity = req.body.quantity;

  // Save the beer and check for errors
  beer.save(function(err) {
    if (err)
      res.send(err);

    res.json({ message: 'Beer added to the locker!', data: beer });
  });
};

// Create endpoint /api/beers for GET
exports.getBeers = function(req, res) {
  // Use the Beer model to find all beer
  Beer.find(function(err, beers) {
    if (err)
      res.send(err);

    res.json(beers);
  });
};

// Create endpoint /api/beers/:beer_id for GET
exports.getBeer = function(req, res) {
  // Use the Beer model to find a specific beer
  Beer.findById(req.params.beer_id, function(err, beer) {
    if (err)
      res.send(err);

    res.json(beer);
  });
};

// Create endpoint /api/beers/:beer_id for PUT
exports.putBeer = function(req, res) {
  // Use the Beer model to find a specific beer
  Beer.findById(req.params.beer_id, function(err, beer) {
    if (err)
      res.send(err);

    // Update the existing beer quantity
    beer.quantity = req.body.quantity;

    // Save the beer and check for errors
    beer.save(function(err) {
      if (err)
        res.send(err);

      res.json(beer);
    });
  });
};

// Create endpoint /api/beers/:beer_id for DELETE
exports.deleteBeer = function(req, res) {
  // Use the Beer model to find a specific beer and remove it
  Beer.findByIdAndRemove(req.params.beer_id, function(err) {
    if (err)
      res.send(err);

    res.json({ message: 'Beer removed from the locker!' });
  });
};

Next, you will need to udpate server.js as follows:

1
2
3
4
5
6
7
8
9
10
11
12
13
14
15
16
17
18
19
20
21
22
23
24
25
26
27
28
29
30
31
32
33
34
35
36
// Load required packages
var express = require('express');
var mongoose = require('mongoose');
var bodyParser = require('body-parser');
var beerController = require('./controllers/beer');

// Connect to the beerlocker MongoDB
mongoose.connect('mongodb://localhost:27017/beerlocker');

// Create our Express application
var app = express();

// Use the body-parser package in our application
app.use(bodyParser.urlencoded({
  extended: true
}));

// Create our Express router
var router = express.Router();

// Create endpoint handlers for /beers
router.route('/beers')
  .post(beerController.postBeers)
  .get(beerController.getBeers);

// Create endpoint handlers for /beers/:beer_id
router.route('/beers/:beer_id')
  .get(beerController.getBeer)
  .put(beerController.putBeer)
  .delete(beerController.deleteBeer);

// Register all our routes with /api
app.use('/api', router);

// Start the server
app.listen(3000);

User Model

The first thing we will need is a model to store our user. This model will be created similarly to the Beer model we made before. Inside the models folder, create a file named user.js and add the following code to it.

1
2
3
4
5
6
7
8
9
10
11
12
13
14
15
16
17
18
19
20
21
22
23
24
25
26
27
28
29
30
31
32
33
34
35
36
37
38
// Load required packages
var mongoose = require('mongoose');
var bcrypt = require('bcrypt-nodejs');

// Define our user schema
var UserSchema = new mongoose.Schema({
  username: {
    type: String,
    unique: true,
    required: true
  },
  password: {
    type: String,
    required: true
  }
});

// Execute before each user.save() call
UserSchema.pre('save', function(callback) {
  var user = this;

  // Break out if the password hasn't changed
  if (!user.isModified('password')) return callback();

  // Password changed so we need to hash it
  bcrypt.genSalt(5, function(err, salt) {
    if (err) return callback(err);

    bcrypt.hash(user.password, salt, null, function(err, hash) {
      if (err) return callback(err);
      user.password = hash;
      callback();
    });
  });
});

// Export the Mongoose model
module.exports = mongoose.model('User', UserSchema);

You will also need to install the bcrypt-nodejs package so we can properly hash out password as we should never store passwords in plain text.

1
npm install bcrypt-nodejs --save

The UserSchema we just created has some similarities to our BeerSchema. You will notice that our fields have an object definding their properties such as type, unique, and required. This allows us to better control with is allowed and required in our models.

We have also added a hook to be called before each call to save() on our User model. This will allow us to check to see if the password has changed. If it has changed, we can then hash it and stored the hash in the model and MongoDB.

User Controller

Now that we have a model to store our user in, we need to make another controller in order to add and view users. The view users implementation will be helpful for this tutorial, but is something you should consider not doing for applications you create. You don’t want to provide a list of all usernames nor do you want to expose the hashed passwords.

In the controllers directory, create a new filed called user.js. Add the following code to this file.

1
2
3
4
5
6
7
8
9
10
11
12
13
14
15
16
17
18
19
20
21
22
23
24
25
26
27
// Load required packages
var User = require('../models/user');

// Create endpoint /api/users for POST
exports.postUsers = function(req, res) {
  var user = new User({
    username: req.body.username,
    password: req.body.password
  });

  user.save(function(err) {
    if (err)
      res.send(err);

    res.json({ message: 'New beer drinker added to the locker room!' });
  });
};

// Create endpoint /api/users for GET
exports.getUsers = function(req, res) {
  User.find(function(err, users) {
    if (err)
      res.send(err);

    res.json(users);
  });
};

With our controller in place, we need to define our routes so that we can add and view users by making calls to our API. In the server.js file, update the code to require the new controller and include the new routes.

1
2
3
4
5
6
7
8
9
10
// Load required packages
...
var userController = require('./controllers/user');

...

// Create endpoint handlers for /users
router.route('/users')
  .post(userController.postUsers)
  .get(userController.getUsers);

You should now be able to fire up your trusty Postman application and make POST and GET calls to http://localhost:3000/api/users. For the POST, be sure to include username and password in order to create a new user.

Auth Controller

1
2
npm install passport --save
npm install passport-http --save

This will install the standard passport package along with passport-http. Passport-http will provide our API HTTP Basic and Digest authentication strategies.

Before we make our auth controller, we need to update our User model to add a function capable of verifying a password in order to authenticate calls to the API. Update your user.js model.

1
2
3
4
5
6
7
8
9
10
11
...

UserSchema.methods.verifyPassword = function(password, cb) {
  bcrypt.compare(password, this.password, function(err, isMatch) {
    if (err) return cb(err);
    cb(null, isMatch);
  });
};

// Export the Mongoose model
module.exports = mongoose.model('User', UserSchema);

Now we can create our auth controller which will manage authentication for our API endpoints. In the controllers directory, add a file auth.js with the following contents.

1
2
3
4
5
6
7
8
9
10
11
12
13
14
15
16
17
18
19
20
21
22
23
24
25
26
27
28
// Load required packages
var passport = require('passport');
var BasicStrategy = require('passport-http').BasicStrategy;
var User = require('../models/user');

passport.use(new BasicStrategy(
  function(username, password, callback) {
    User.findOne({ username: username }, function (err, user) {
      if (err) { return callback(err); }

      // No user found with that username
      if (!user) { return callback(null, false); }

      // Make sure the password is correct
      user.verifyPassword(password, function(err, isMatch) {
        if (err) { return callback(err); }

        // Password did not match
        if (!isMatch) { return callback(null, false); }

        // Success
        return callback(null, user);
      });
    });
  }
));

exports.isAuthenticated = passport.authenticate('basic', { session : false });

What we are doing here is setting up passport to use the Basic authentication stategy provided by the passport-http package. For our BasicStrategy, we are defining a callback that will attempt to look up the user using the provided username and if found see if the password is correct. If all works well, it will call the callback method and provide the found user.

The final piece of this is exporting the isAuthenticated function which tells passport to authenticate using our BasicStrategy. The option of session being set to false tells passport to not store session variables between calls to our API. This forces the user to submit the username and password on each call.

The last piece is to update our server.js file to include the passport package, initialize it with our express app, and call the isAuthenticated function for each call to our API. Open up server.js and update it as follows.

1
2
3
4
5
6
7
8
9
10
11
12
13
14
15
16
17
18
19
20
21
22
23
24
25
26
27
28
29
30
31
32
33
34
35
36
37
38
39
// Load required packages
...
var passport = require('passport');
var authController = require('./controllers/auth');

// Connect to the beerlocker MongoDB
mongoose.connect('mongodb://localhost:27017/beerlocker');

// Create our Express application
var app = express();

// Use the body-parser package in our application
app.use(bodyParser.urlencoded({
  extended: true
}));

// Use the passport package in our application
app.use(passport.initialize());

// Create our Express router
var router = express.Router();

// Create endpoint handlers for /beers
router.route('/beers')
  .post(authController.isAuthenticated, beerController.postBeers)
  .get(authController.isAuthenticated, beerController.getBeers);

// Create endpoint handlers for /beers/:beer_id
router.route('/beers/:beer_id')
  .get(authController.isAuthenticated, beerController.getBeer)
  .put(authController.isAuthenticated, beerController.putBeer)
  .delete(authController.isAuthenticated, beerController.deleteBeer);

// Create endpoint handlers for /users
router.route('/users')
  .post(userController.postUsers)
  .get(authController.isAuthenticated, userController.getUsers);

...

What we have done here, is insert the isAuthenticated funtion in the callback chain for our endpoint handlers. If a call is made to any of these endpoints without a valid username and password, the request will be denied with a 401 HTTP response.

If you haven’t already created a user, go ahead and create one now by posting to http://localhost:3000/api/users and remember your username and password.

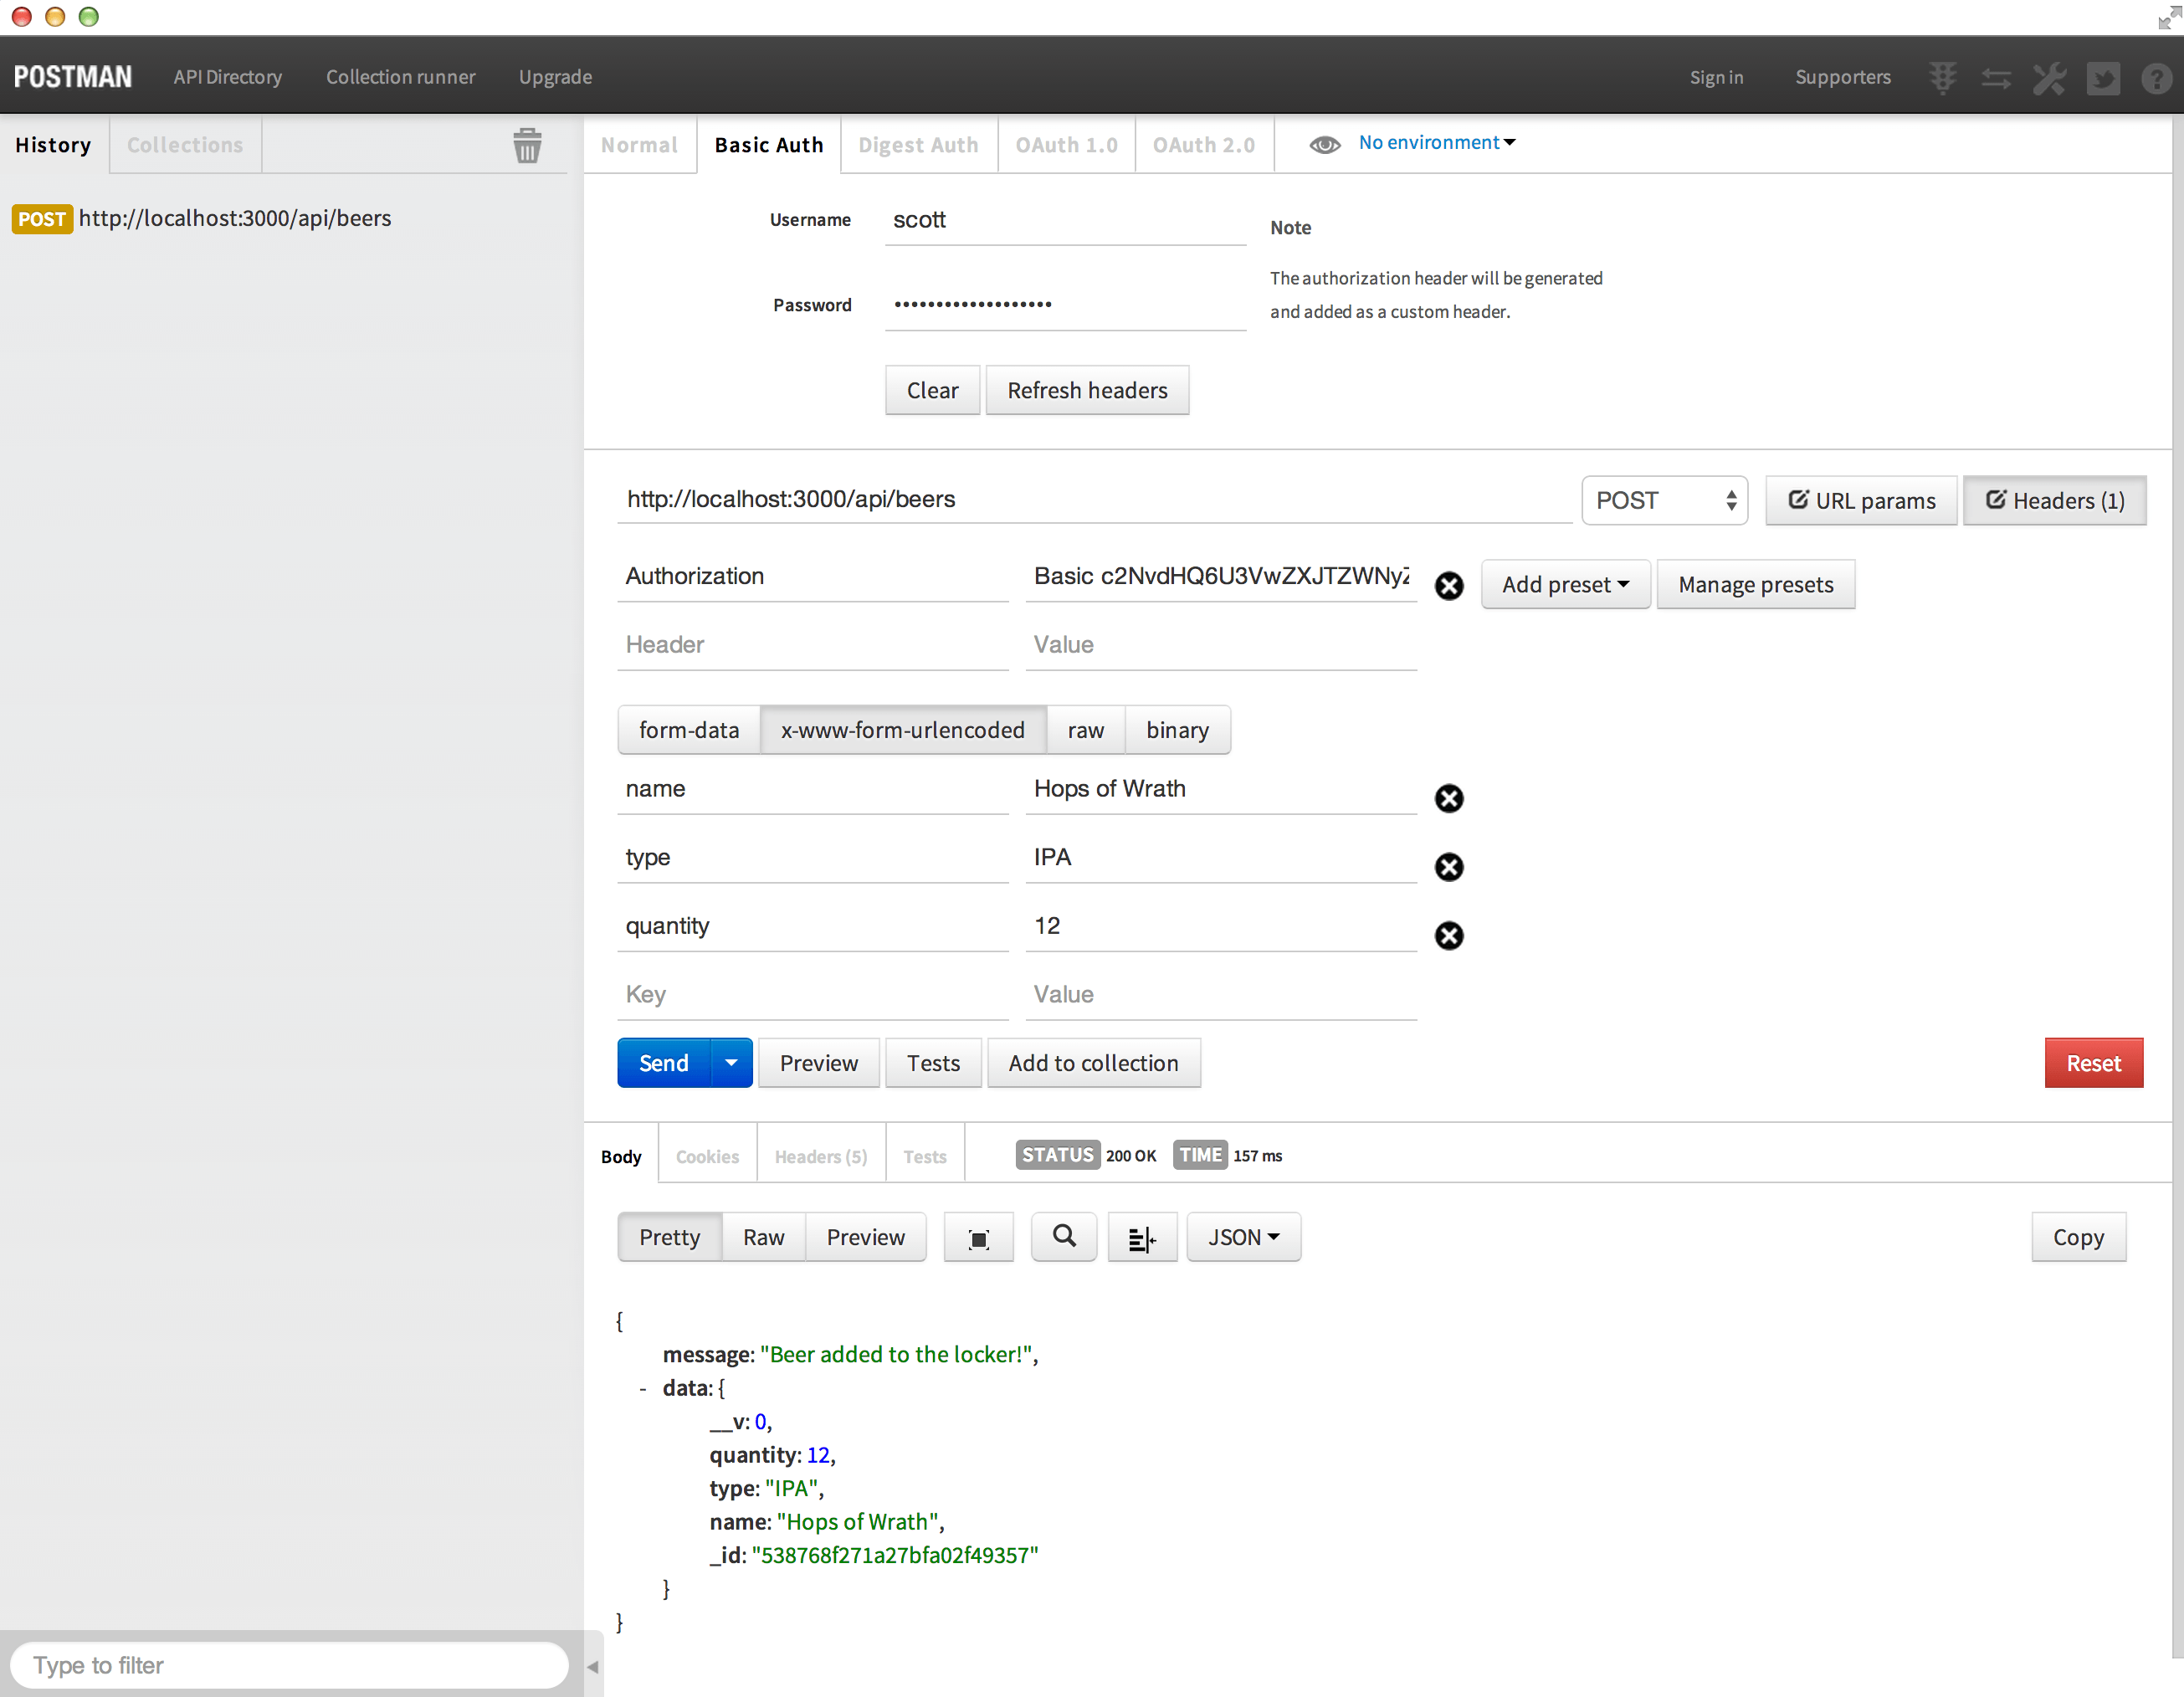
Now you can make a call to any of the endpoints we defined that call the isAuthenticated function to test that your authentication is working. If you are using Postman, you can use the Basic Auth tab towards the top to enter your username and password. Postman will then automatically create the Authorization header and value for you.

Here is a screenshot of me adding some beer to the locker with valid credentials.

Postman

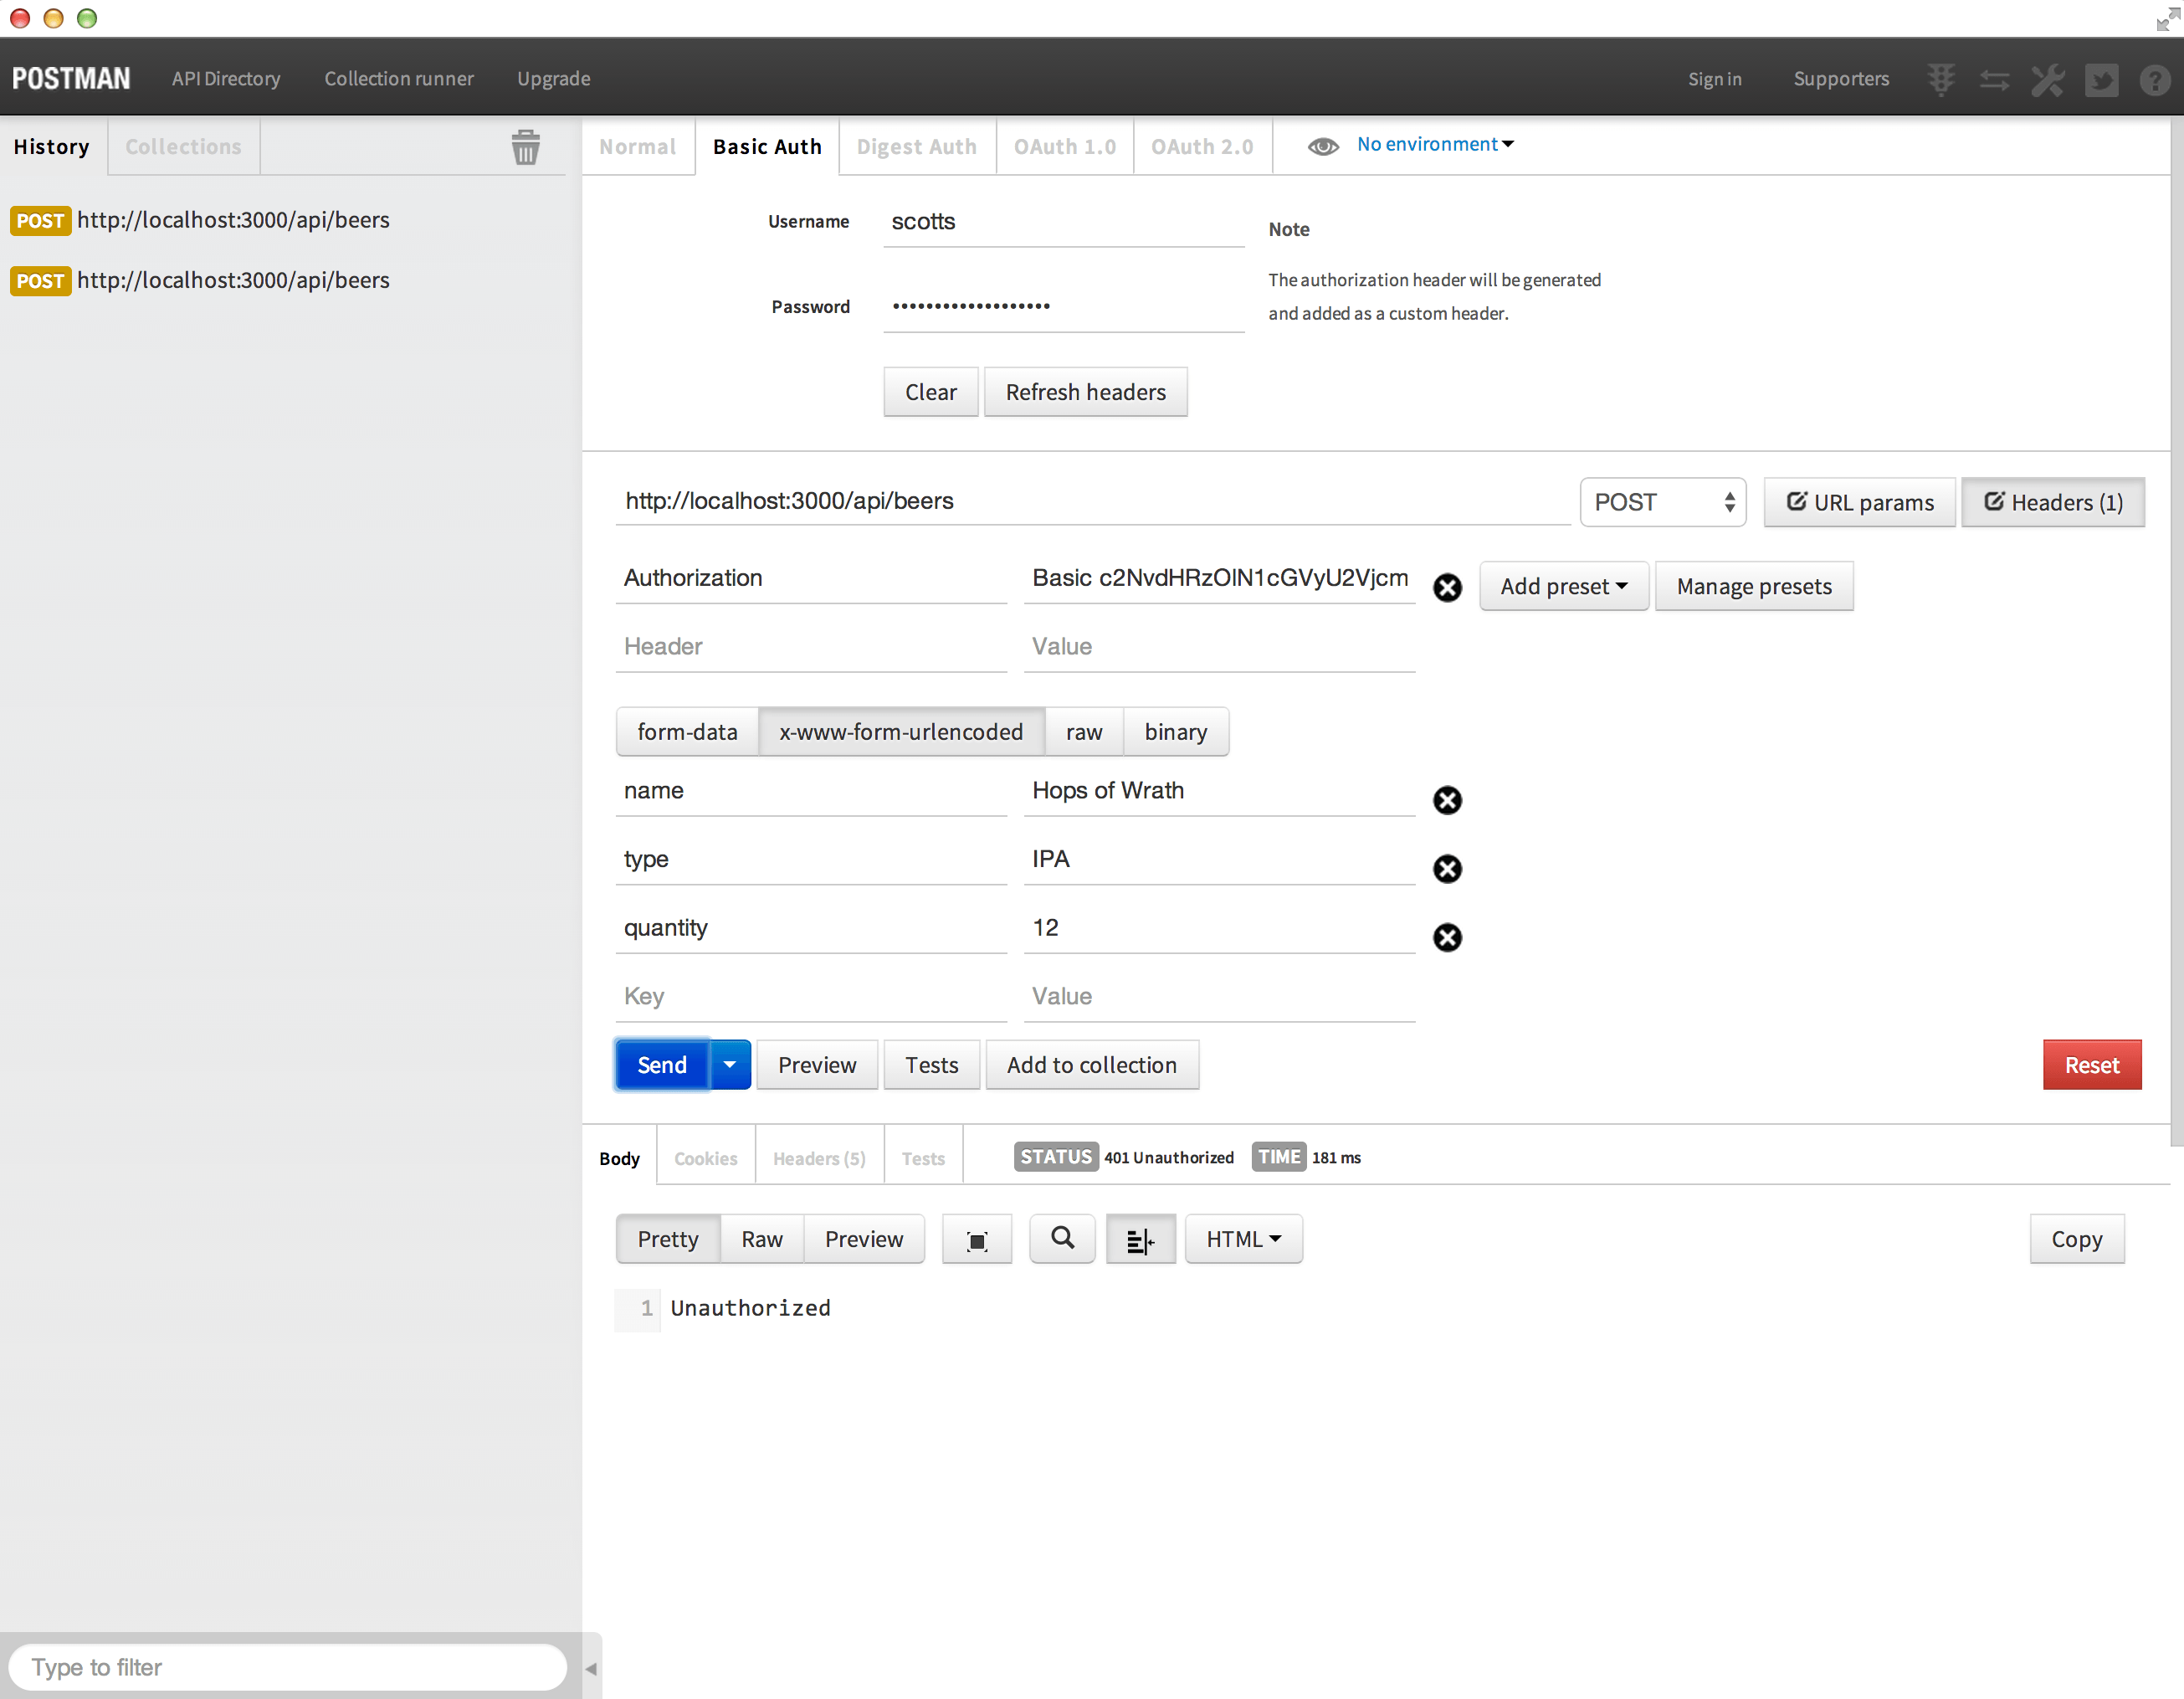
Here is a screenshot of me trying to add beer with an invalid username.

Postman

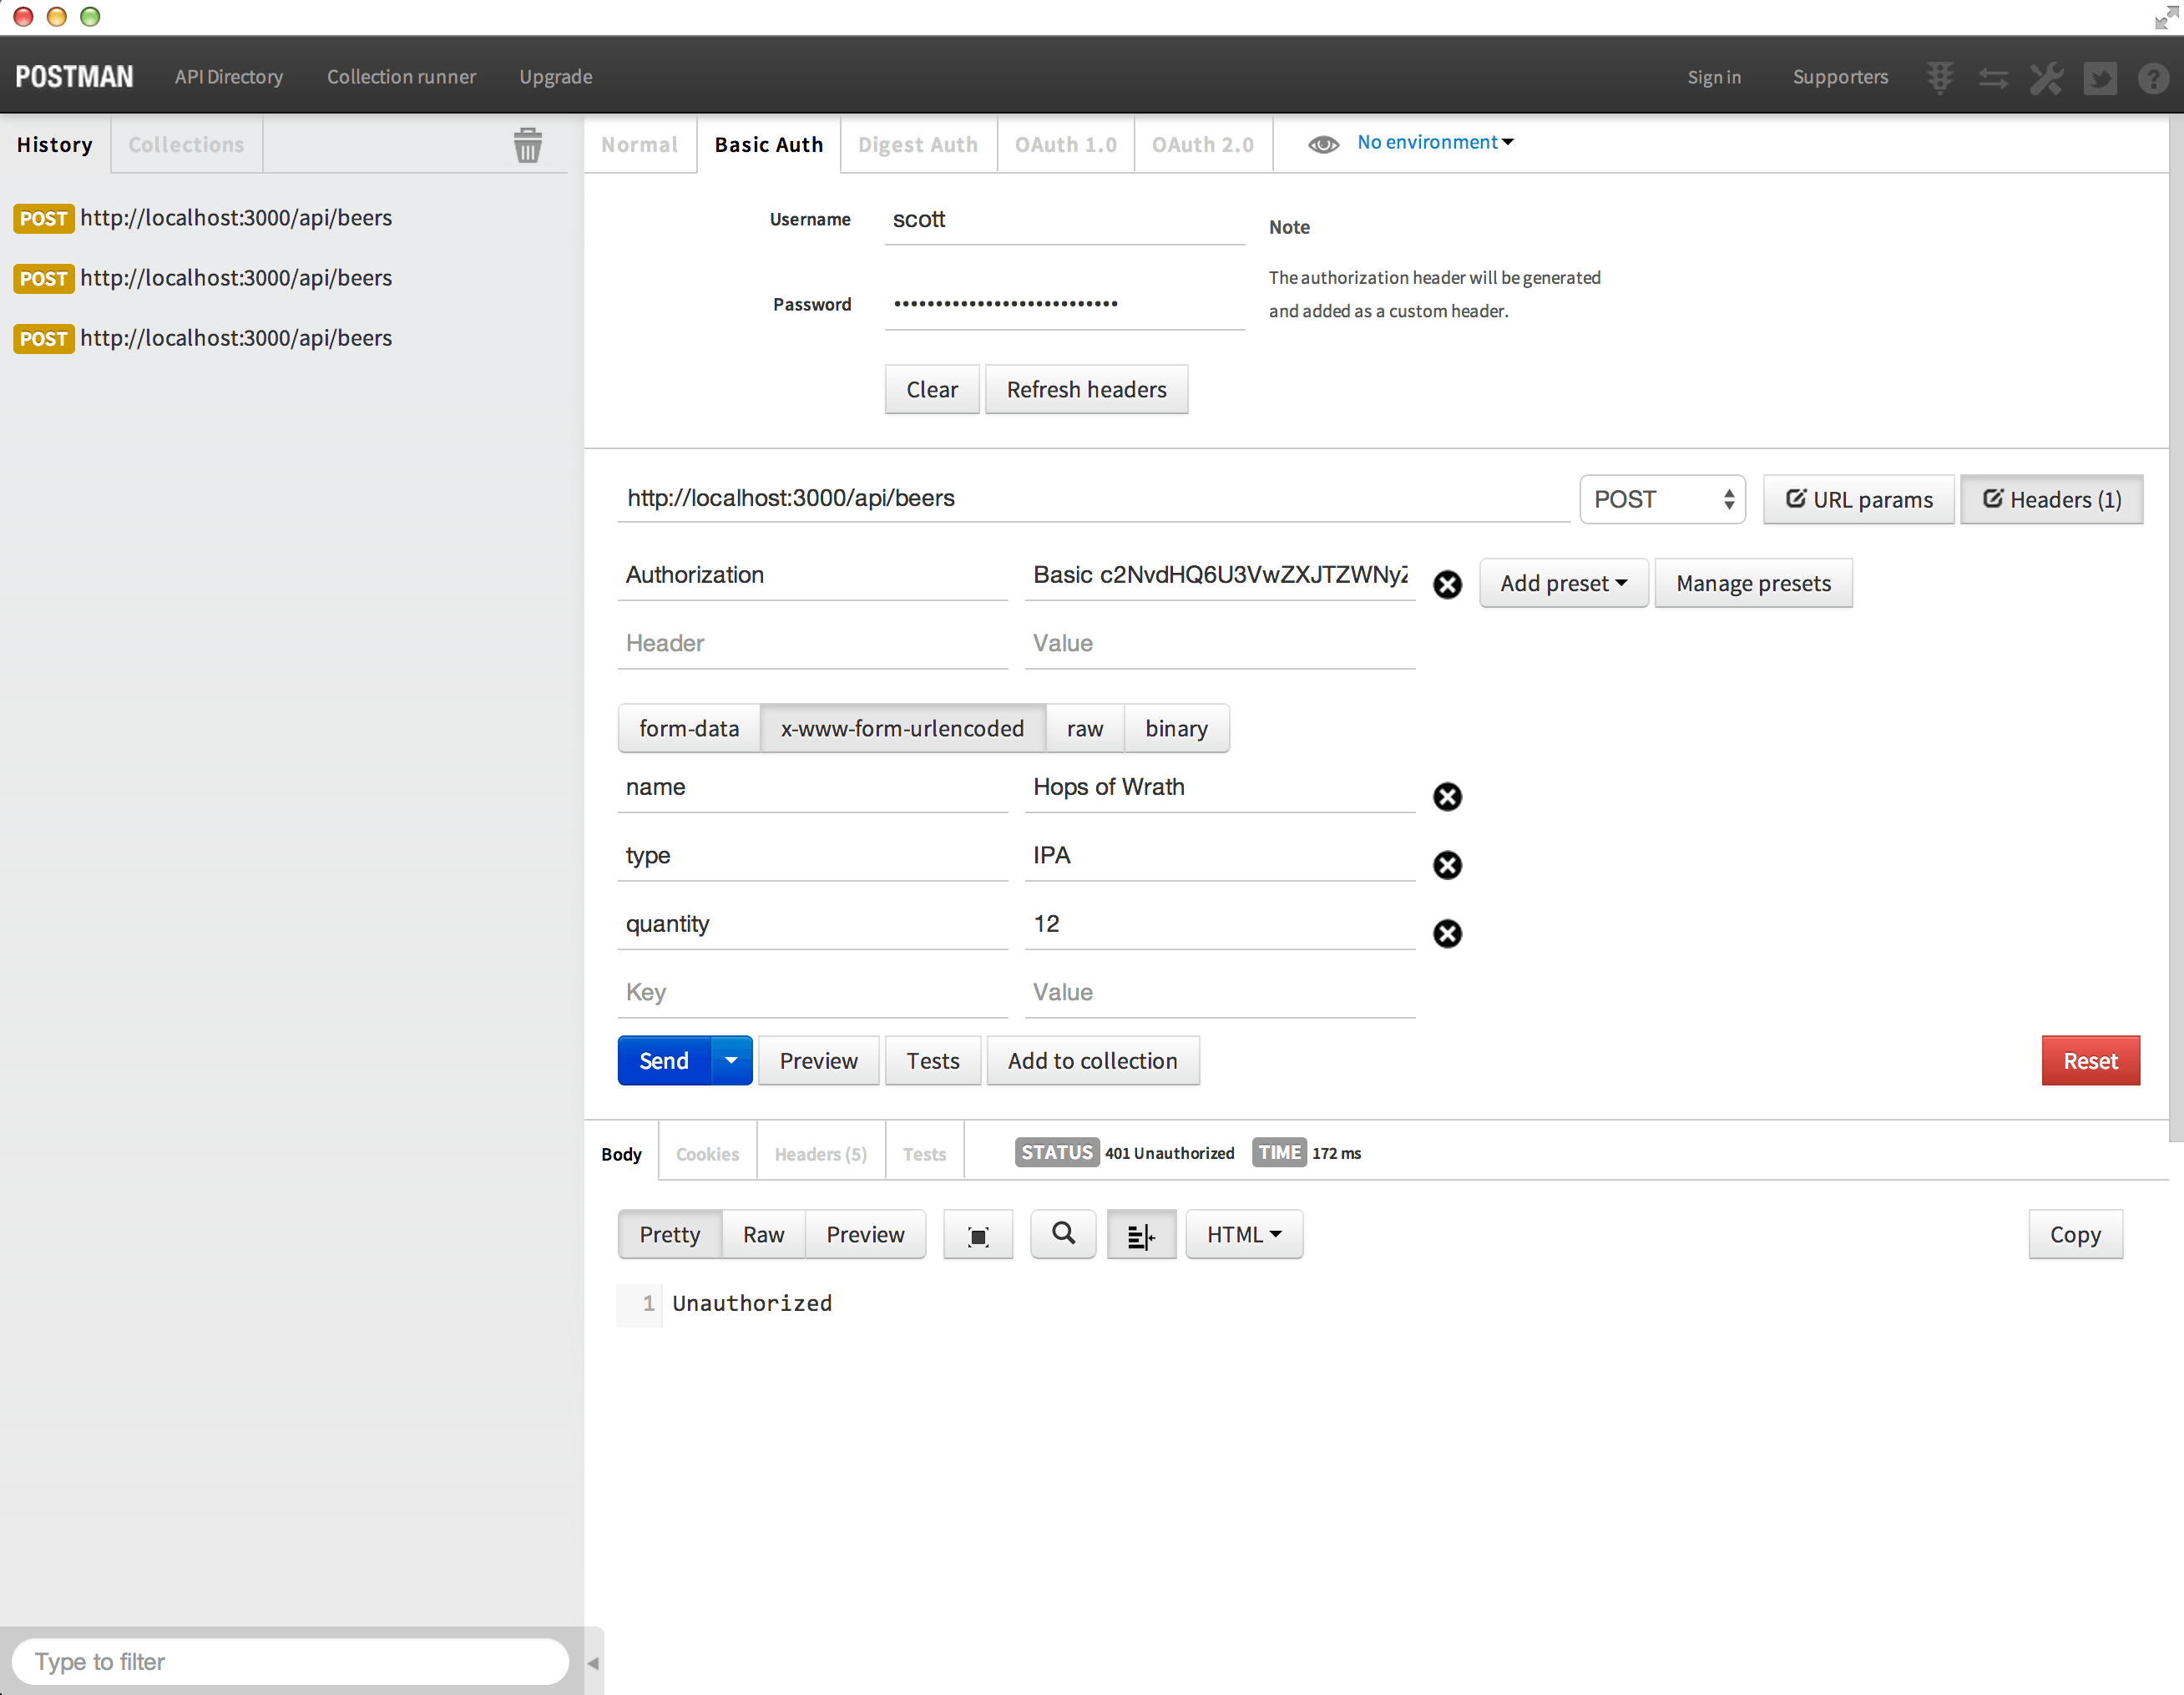
Here is a screenshot of me trying to add beer with an invalid password.

Postman

Hey, that is my beer!

We now have the ability to require authentication for calls to our API. We still need a way to make sure when beer is added, removed, etc that it is done for the authenticated user.

The first thing we need to do is add a field to our Beer model to store the id of the user that owns it. Update your Beer model in the beer.js file.

1
2
3
4
5
6
7
8
9
10
11
12
13
// Load required packages
var mongoose = require('mongoose');

// Define our beer schema
var BeerSchema   = new mongoose.Schema({
  name: String,
  type: String,
  quantity: Number,
  userId: String
});

// Export the Mongoose model
module.exports = mongoose.model('Beer', BeerSchema);

Now that our model can store a user id, we need to update our Beer endpoint handlers to set the id when adding and query with the id when getting, updating, and deleting. Open up the beer.js file in the controllers directory and update it to the following code.

1
2
3
4
5
6
7
8
9
10
11
12
13
14
15
16
17
18
19
20
21
22
23
24
25
26
27
28
29
30
31
32
33
34
35
36
37
38
39
40
41
42
43
44
45
46
47
48
49
50
51
52
53
54
55
56
57
58
59
60
61
62
63
64
65
66
// Load required packages
var Beer = require('../models/beer');

// Create endpoint /api/beers for POST
exports.postBeers = function(req, res) {
  // Create a new instance of the Beer model
  var beer = new Beer();

  // Set the beer properties that came from the POST data
  beer.name = req.body.name;
  beer.type = req.body.type;
  beer.quantity = req.body.quantity;
  beer.userId = req.user._id;

  // Save the beer and check for errors
  beer.save(function(err) {
    if (err)
      res.send(err);

    res.json({ message: 'Beer added to the locker!', data: beer });
  });
};

// Create endpoint /api/beers for GET
exports.getBeers = function(req, res) {
  // Use the Beer model to find all beer
  Beer.find({ userId: req.user._id }, function(err, beers) {
    if (err)
      res.send(err);

    res.json(beers);
  });
};

// Create endpoint /api/beers/:beer_id for GET
exports.getBeer = function(req, res) {
  // Use the Beer model to find a specific beer
  Beer.find({ userId: req.user._id, _id: req.params.beer_id }, function(err, beer) {
    if (err)
      res.send(err);

    res.json(beer);
  });
};

// Create endpoint /api/beers/:beer_id for PUT
exports.putBeer = function(req, res) {
  // Use the Beer model to find a specific beer
  Beer.update({ userId: req.user._id, _id: req.params.beer_id }, { quantity: req.body.quantity }, function(err, num, raw) {
    if (err)
      res.send(err);

    res.json({ message: num + ' updated' });
  });
};

// Create endpoint /api/beers/:beer_id for DELETE
exports.deleteBeer = function(req, res) {
  // Use the Beer model to find a specific beer and remove it
  Beer.remove({ userId: req.user._id, _id: req.params.beer_id }, function(err) {
    if (err)
      res.send(err);

    res.json({ message: 'Beer removed from the locker!' });
  });
};

One of the great things about passport is that it will automatically set the authenticated user in the req.user object. This allows us to easily get ahold of the user id in order to set it when adding beer to our locker. You can see in the postBeers() function we are setting the userId to req.user._id.

The other 4 endpoints have had their find(), update(), and remove() functions updated to pass in the userId in order to control which beer we can get, update and delete.

Wrap up

You can now add multiple users, have each user add, remove, update, and get their own beer without the fear of anyone else getting into their stash! Up next will dive into allowing others to access our locker via OAuth powered by OAuth2orize.

Source code for this part can be found here on GitHub.